
Business user guide
See how to use the service and every step of the process at a glance.
Guide overview
This guide walks through the full flow for brands on Glow.B — from creating a campaign and selecting creators to reviewing deliverables and analyzing performance.
- Brand
- The business user who creates and runs campaigns.
- Creator
- The participant who partners with brands to produce content.
Glow.B is a creator marketing automation platform that connects brands with creators. Everything from creator recruitment to ad management runs through the system, so you can operate campaigns without direct back-and-forth.
| Feature | Description |
|---|---|
| Creator recruitment | Recruit creators who fit your brand and product, with automated AI DMs |
| Campaign automation | Handle the entire process in one place |
| Schedule reminders | Email reminders at each campaign stage |
| Receive final deliverables | Easily receive final deliverables after upload |
Sign-up steps
- 1
Visit the Glow.B website
Open the business site (biz.glowb.io) in your browser.
- 2
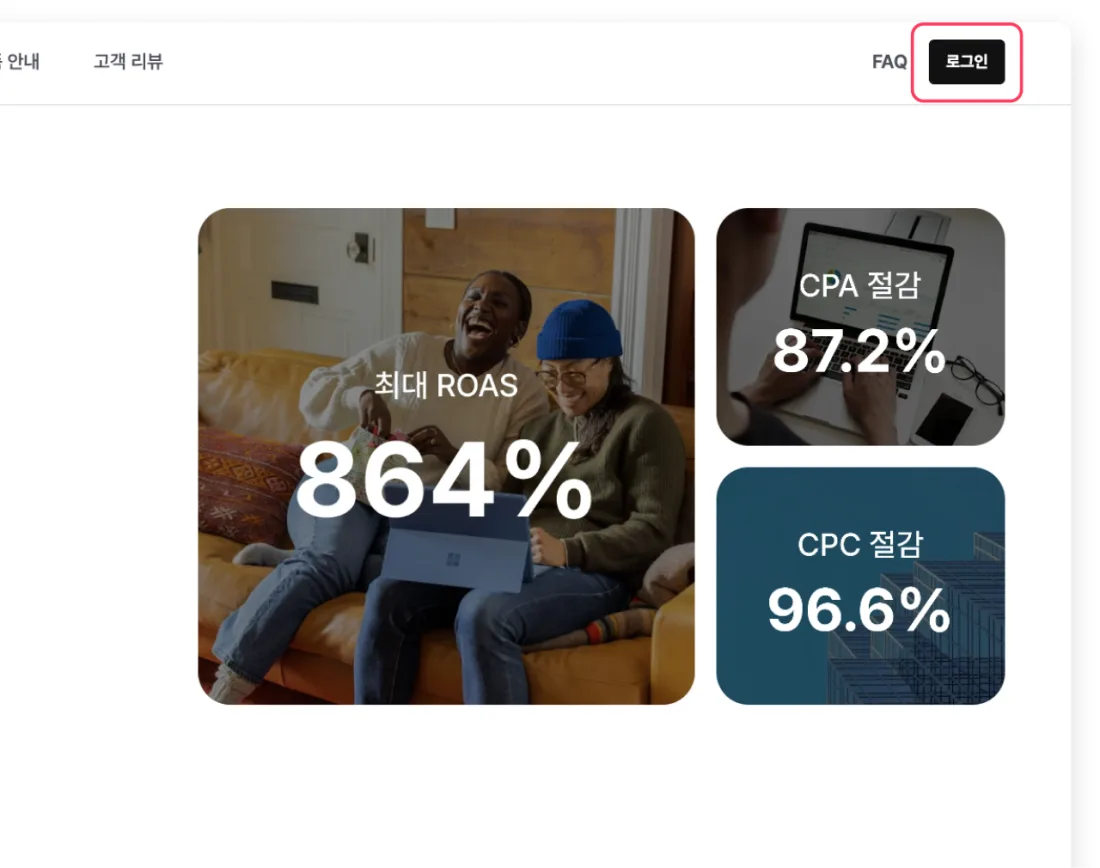
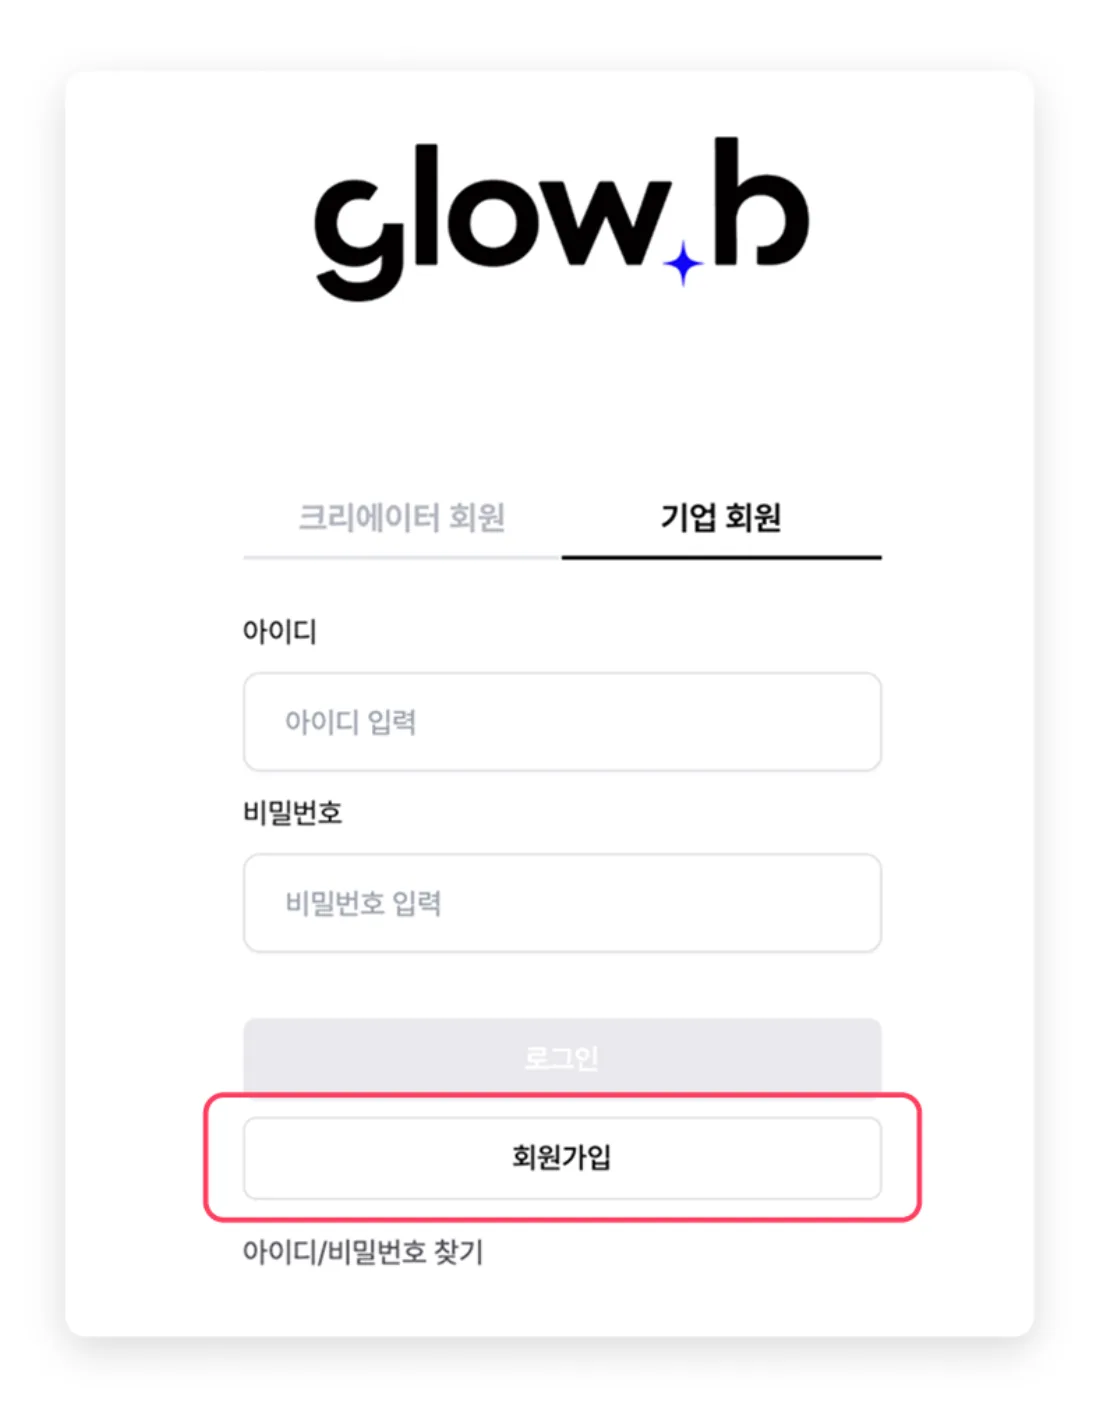
Click [Log in/Sign up]
Click the button in the top-right corner of the main page.
- 3
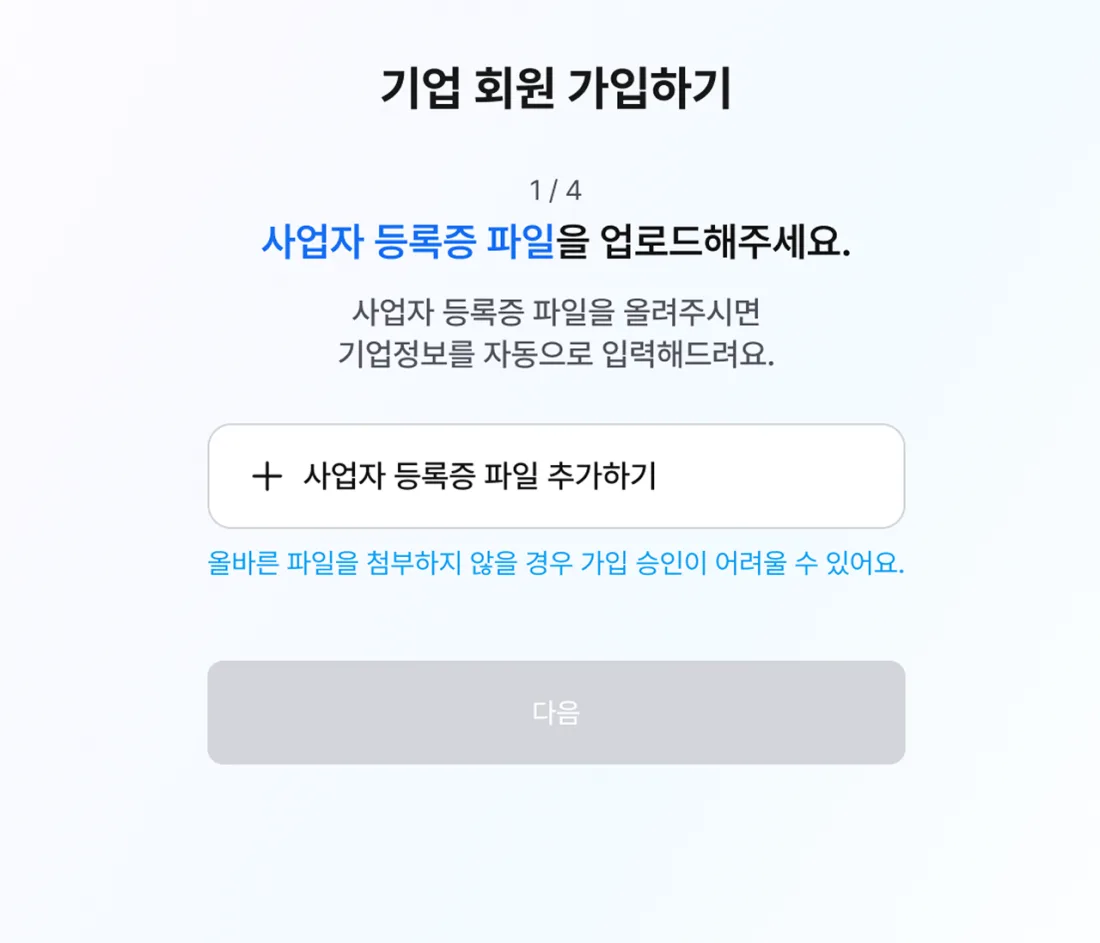
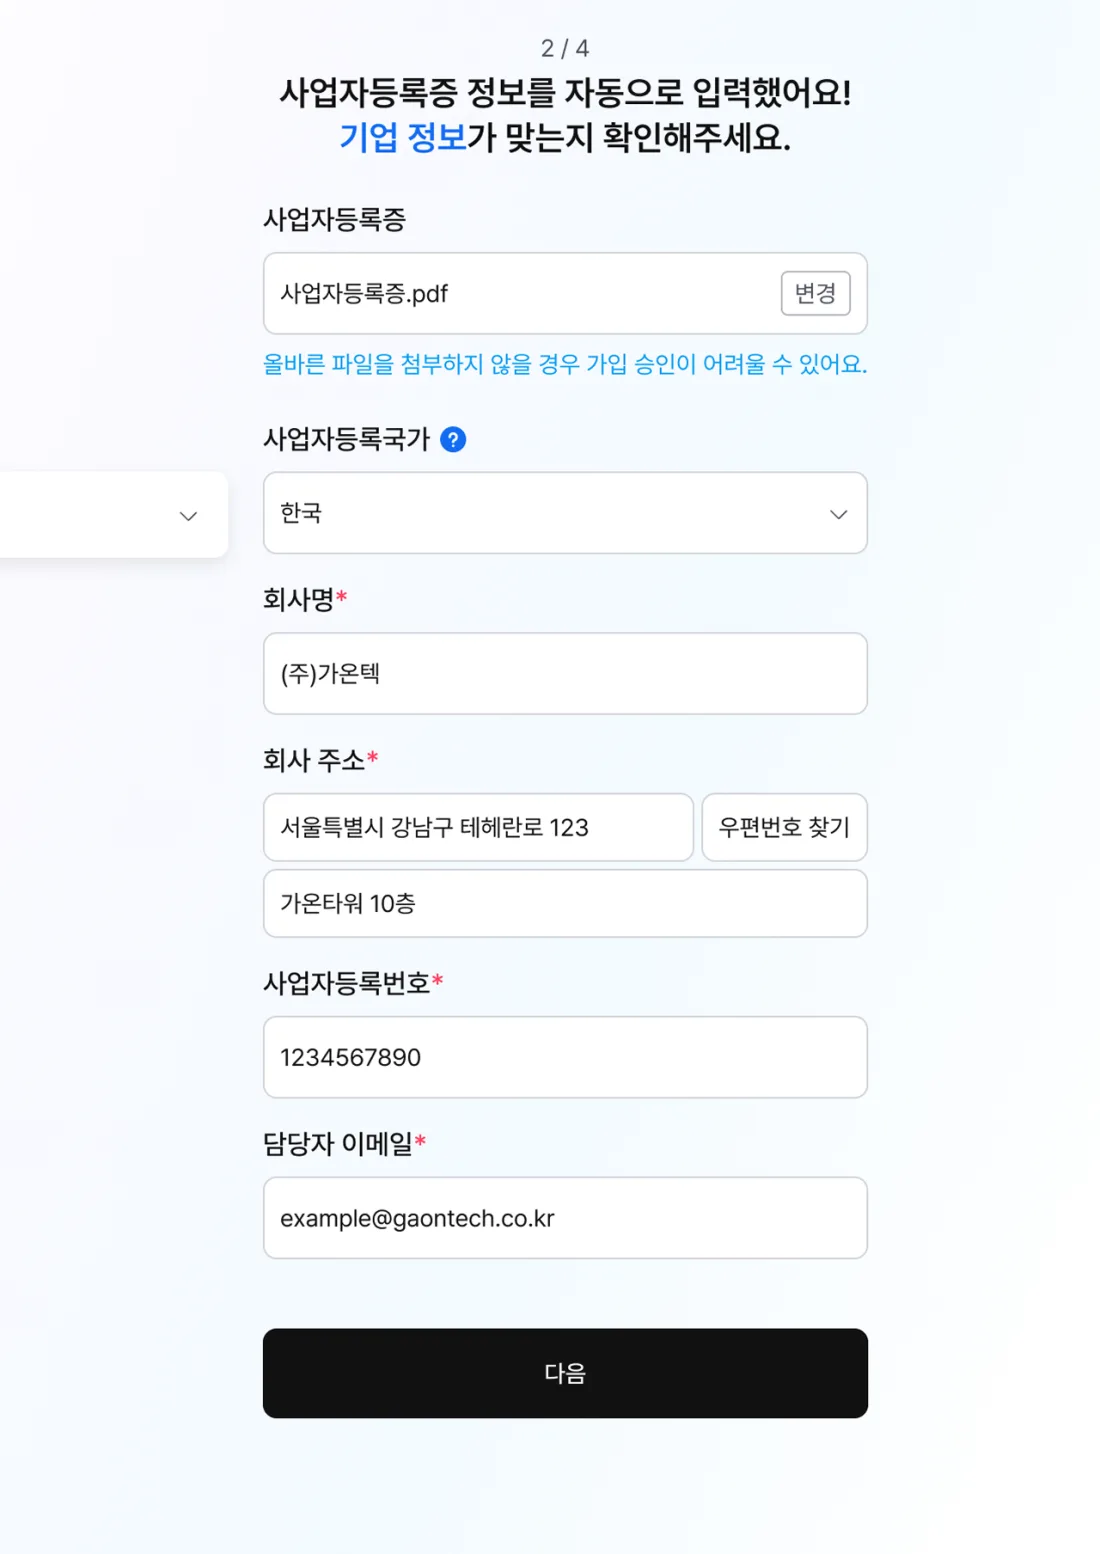
Attach your business registration certificate and enter company details
Upload your business registration certificate and enter your country of registration, company name, company address, business registration number, and manager email.
- 4
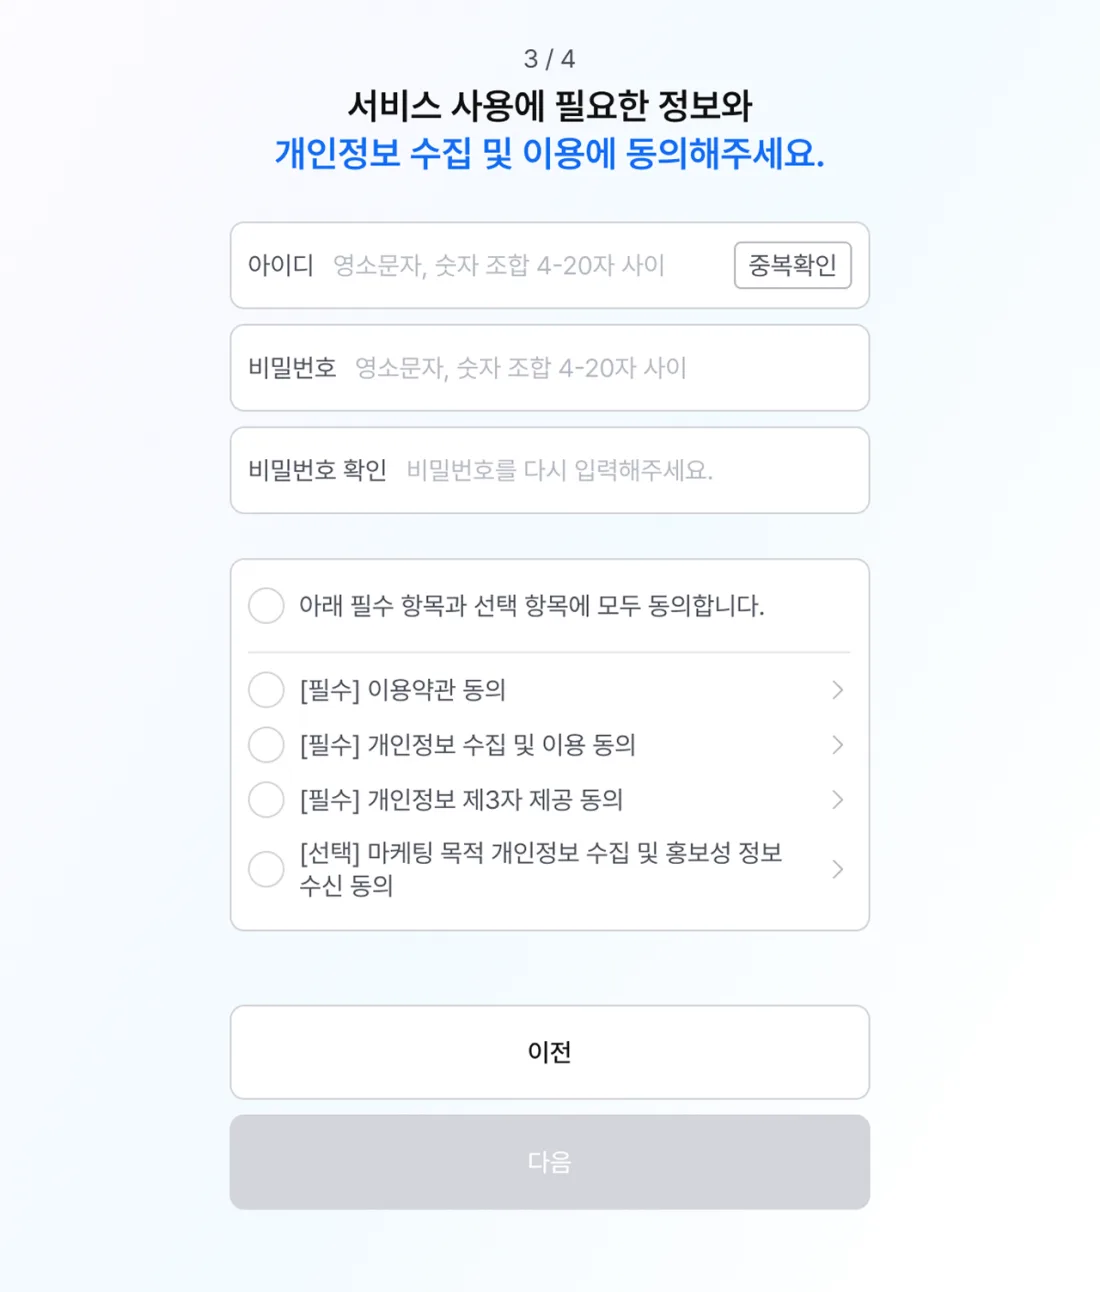
Set up account details
Choose the ID and password you'll use to log in.
- 5
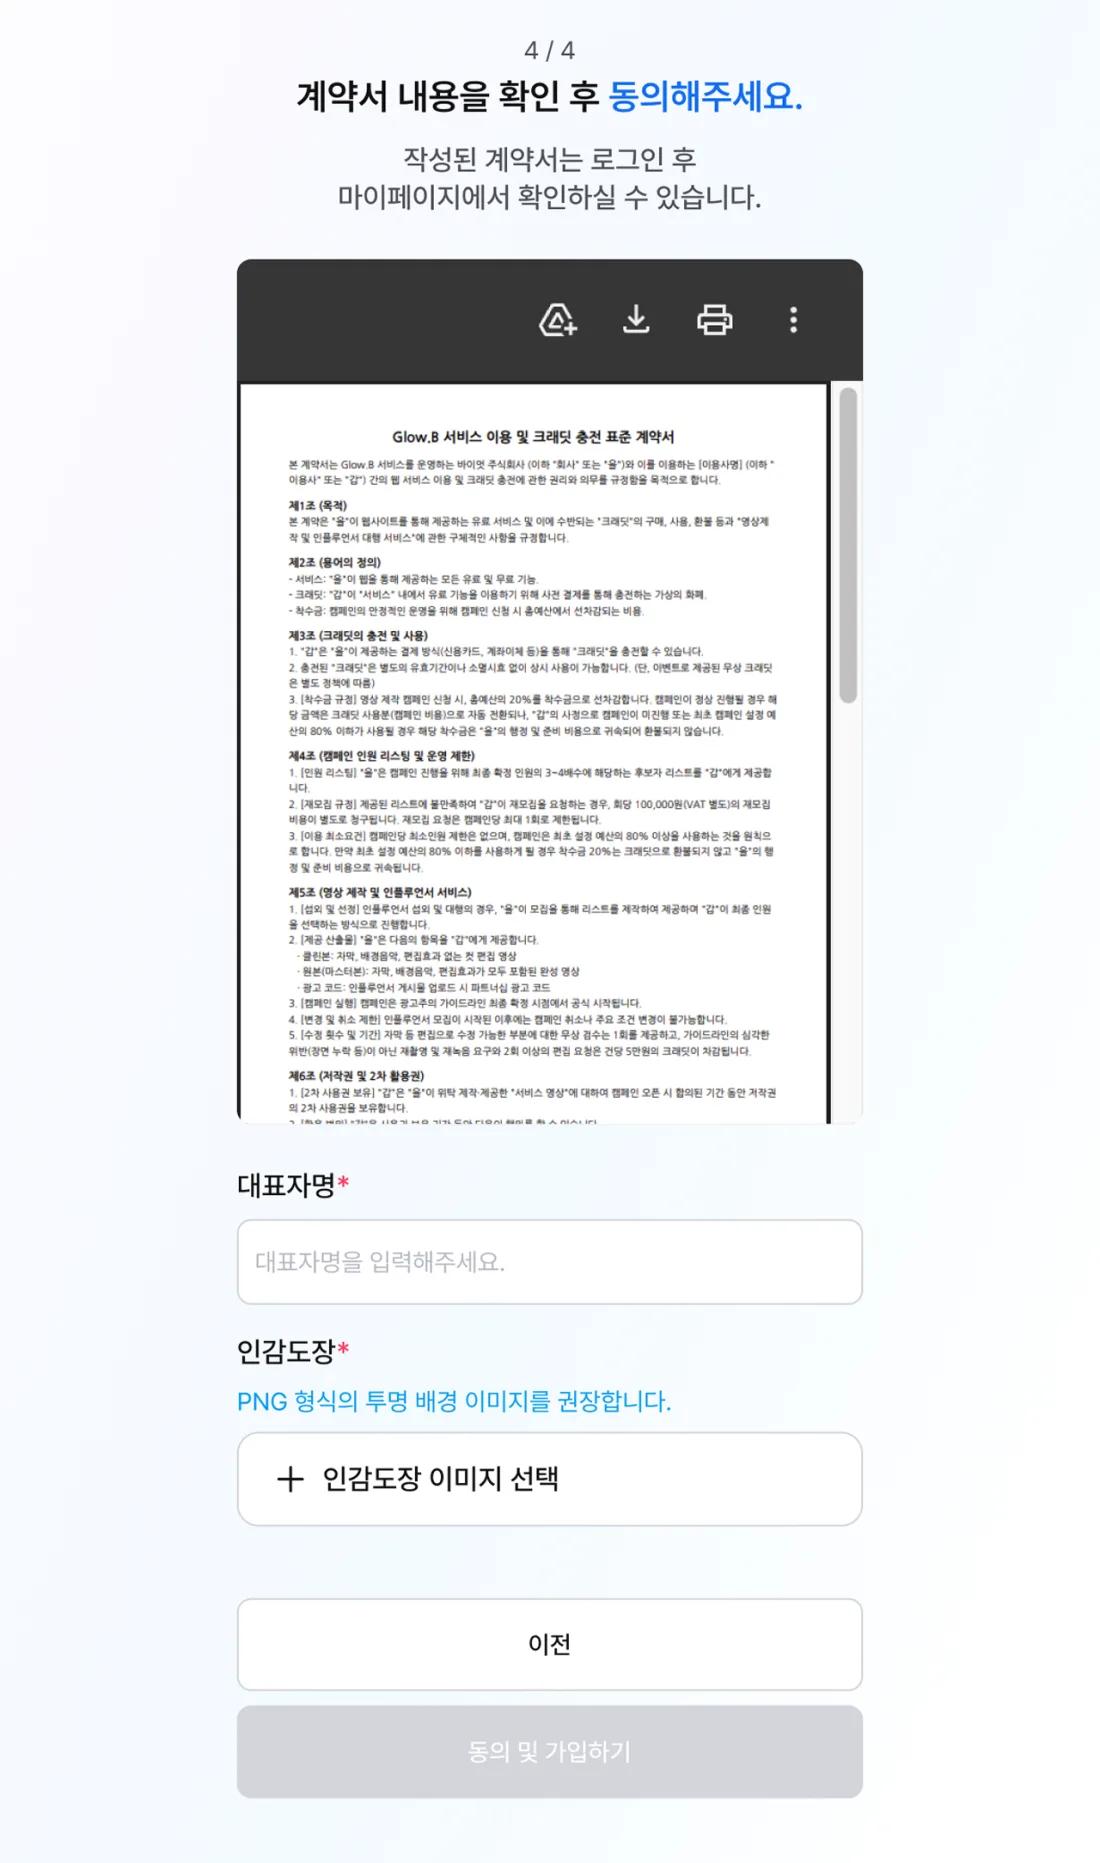
Attach your company seal for contract signing
Enter the representative's name and attach your company seal file to sign the service agreement.
- 6
Internal approval and sign-up complete
Once your business is verified, a sign-up approval email is sent to the address you entered.
Log-in steps
- 1
Click [Log in/Sign up] in the top-right corner
- 2
Enter your ID and password, then click [Log in]
Note
If you've forgotten your ID or password, use [Find ID/Password] at the bottom of the log-in page to reset it after verifying your business registration number and email.
Click [Create campaign] on the Glow.B main page or in your campaign dashboard. This is where you set the core conditions for your short-form marketing, such as budget and production scale. Writing the detailed guideline and recruiting creators happen in the next steps, after the campaign is created.
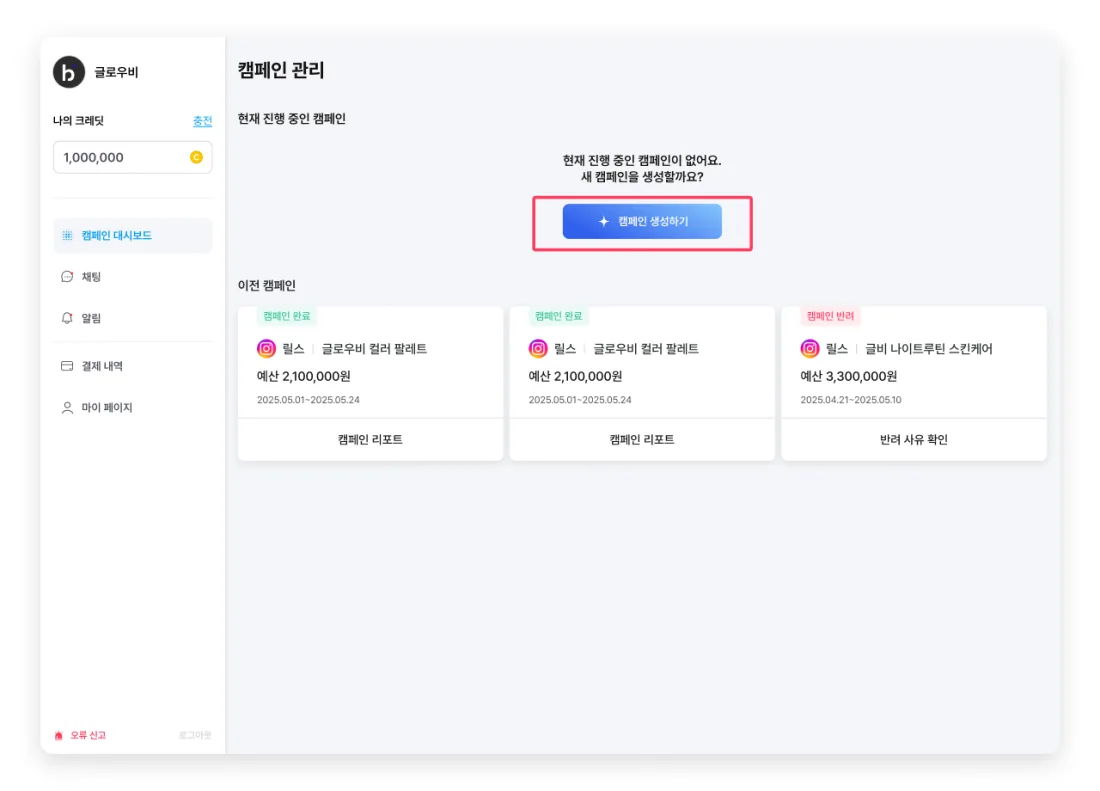
📋 6 key conditions to set when creating a campaign
| Dashboard setting | What it means | Example and tips |
|---|---|---|
| Total marketing budget | The total ad spend cap for this short-form campaign | e.g. ₩1,500,000 (a ₩300,000 deposit per creator) |
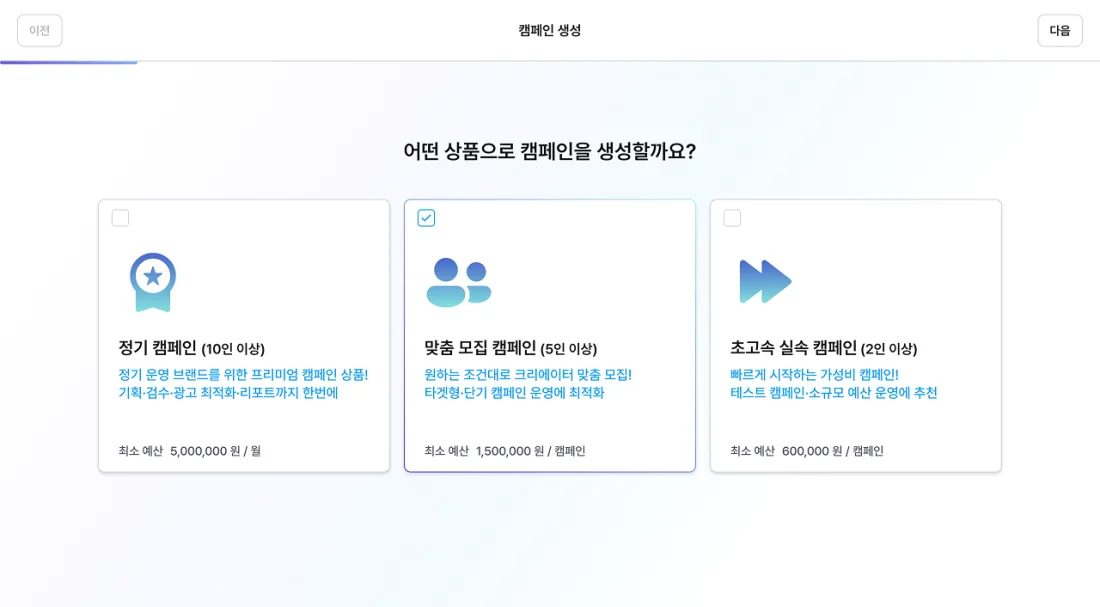
| Number of creators | Match the number of collaborators with the total number of videos you need. Each creator produces one short-form video by default. | e.g. 5 creators → 5 short-form videos |
 | ||
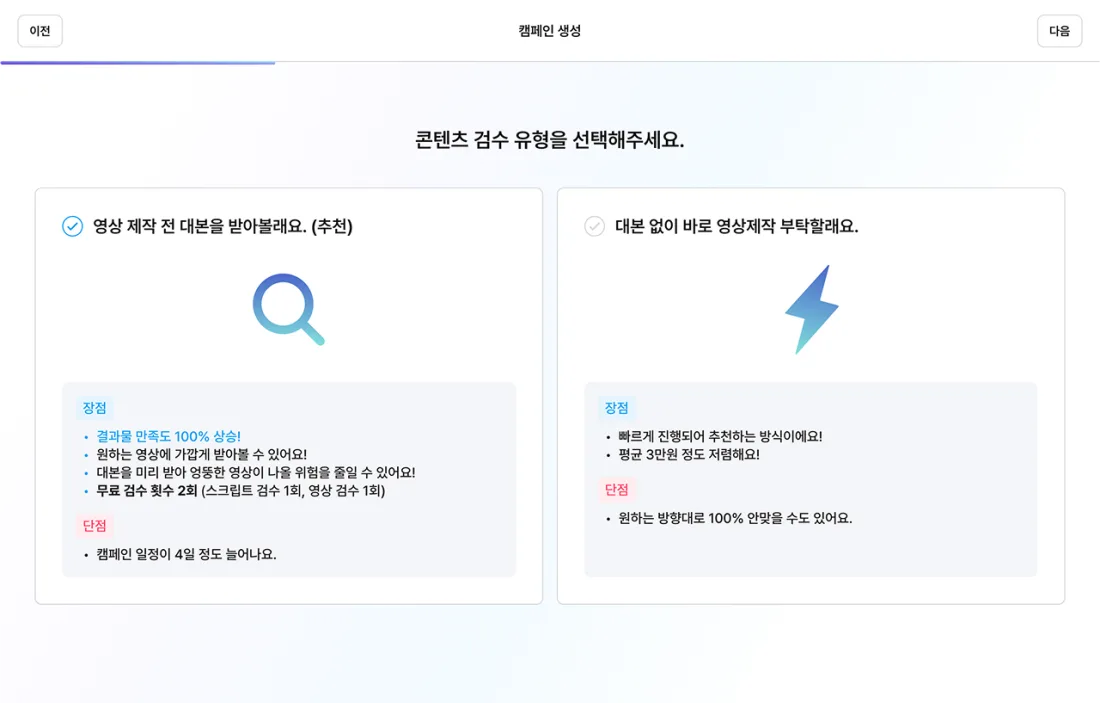
| Content review type | Choose whether to receive a script before video production. Your choice affects the number of free reviews and the schedule. | Get a script (recommended): 2 free reviews, adds 4 days Go straight to video: faster and about ₩30,000 cheaper on average |
 | ||
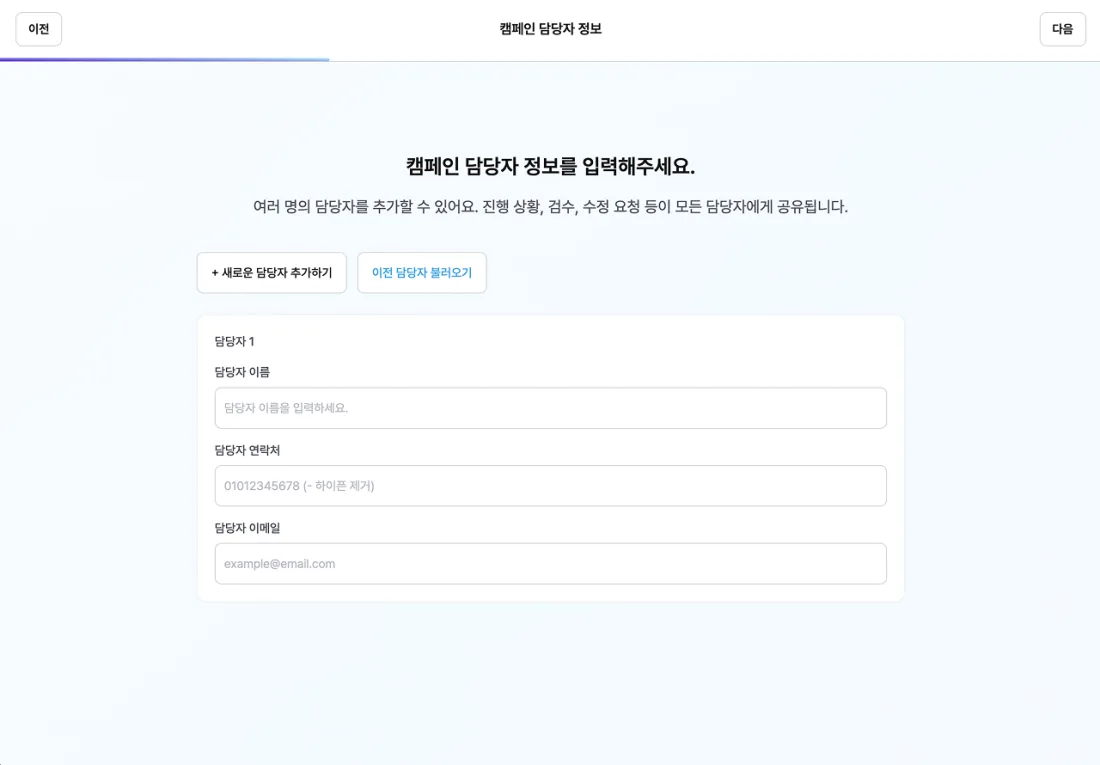
| Progress notification contacts | Team members who receive submission and upload notifications at each stage | You can add multiple people, such as marketers or the brand's main account |
 | ||
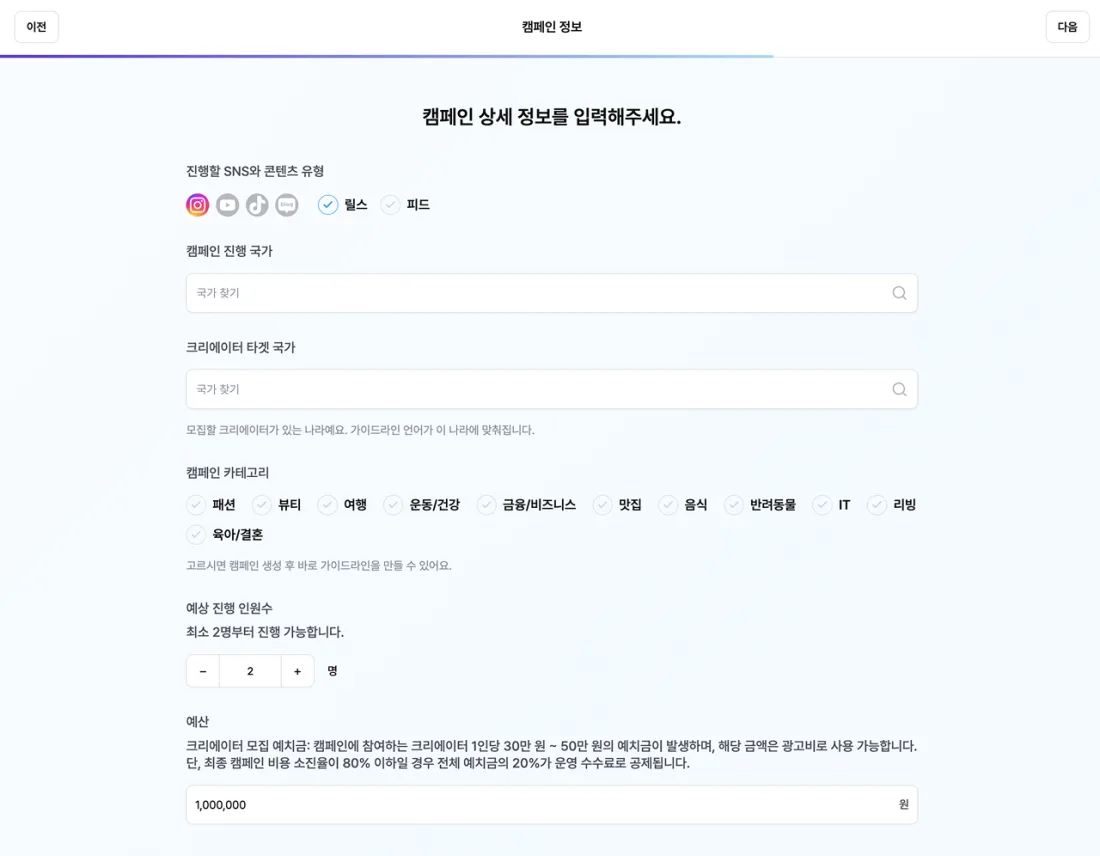
| Target platform and country | The social channel and target country for your short-form videos | e.g. Instagram Reels / South Korea |
 | ||
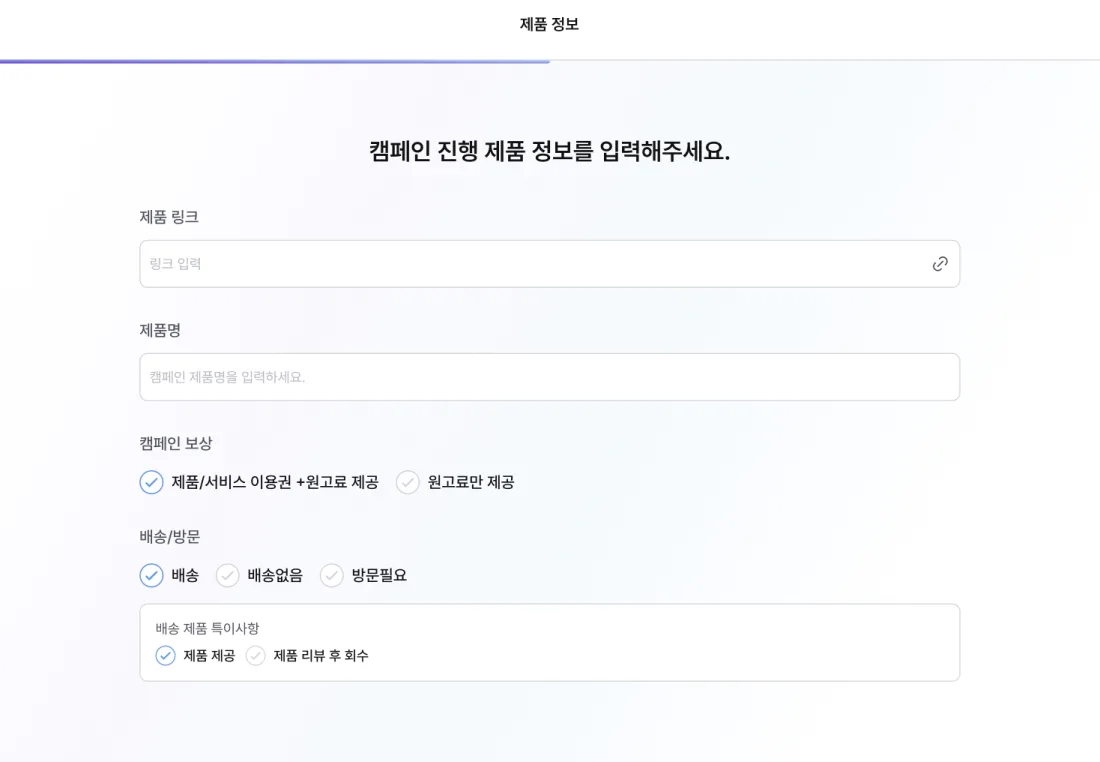
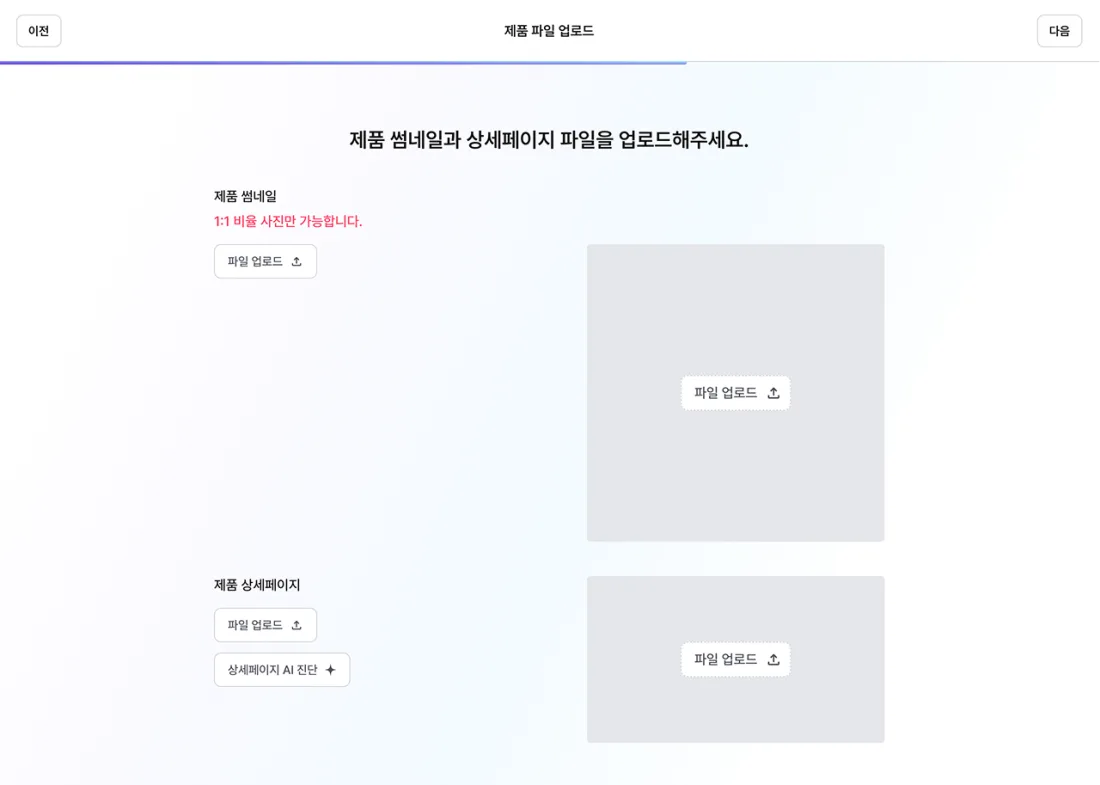
| Promoted product and sponsorship type | Register the product name, product page URL, and main thumbnail, and choose whether the product is provided free of charge (shipped) | Product name/link/thumbnail required |
  | ||
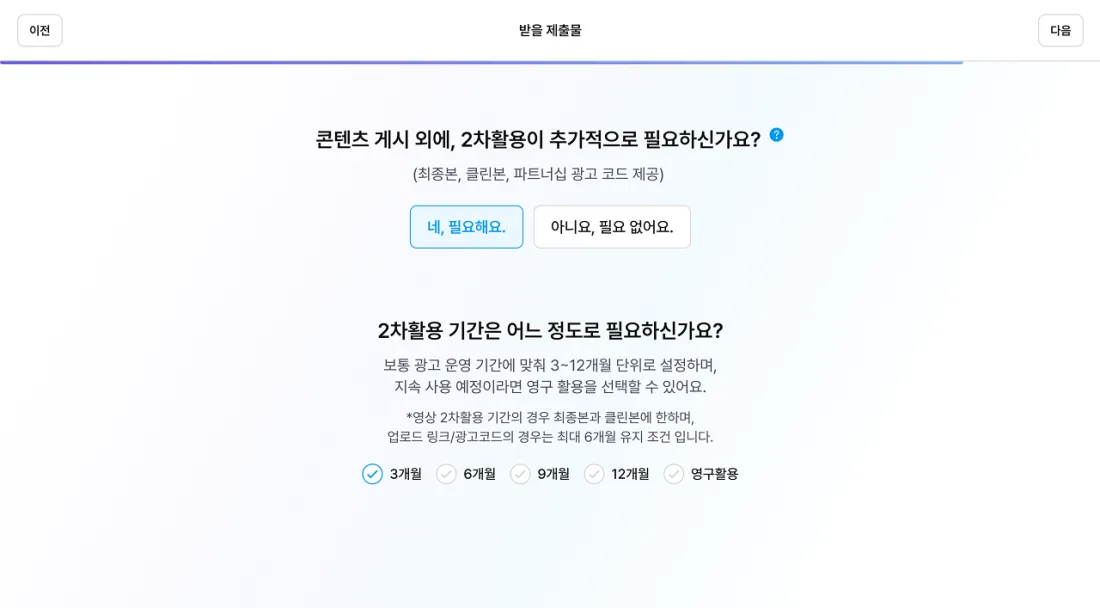
| Secondary usage terms | The license period for reposting finished videos on the brand's official accounts or using them in paid media | e.g. Secondary usage agreed / 3 months (recommended) |
 | ||
🔄 From campaign submission to a finalized guideline
- 1
AI drafts the content guideline and notifies you
Once the campaign is created, AI starts drafting the content guideline. It keeps running even if you leave the page, and a completion email is sent automatically to the registered manager once the draft is ready.
- 2
Pay with campaign credits
Credits are required to build out the detailed guideline. Click [Use credits and finish] to pay. If you don't have enough credits, you'll be taken to the top-up page automatically, and your work in progress is saved as a draft.
- 3
Finalize the content guideline
In the campaign dashboard, click [Pay with campaign credits] and then edit and finalize the guideline, or follow edit content guideline → Complete guideline → [Use credits and finish] to finalize it.
Key takeaways and credit top-up
This step locks in the basic conditions of your project before creator recruitment. The matching and contracts in the next step run automatically based on these values, so set your budget and headcount to match your marketing KPIs. Credits must be prepaid before you can finalize the content guideline. If you need to top up, use the button below.
In this step, you build the video production brief that will be proposed to creators, based on your campaign conditions. Glow.B AI learns from your product page to create a draft, and you review and edit each section to finalize it.
Step 1. Basic information for AI
- The product link you registered when creating the campaign is shown automatically.
- You can attach a preferred concept or an existing guideline file — up to 2 PDFs and 3 reference links.
- Continue with [Generate AI guideline] or [Create guideline without AI].
Expand screen preview · Entering basic information for AI
The text below is an example of the UI copy shown on the actual screen.
If you already have a guideline, feel free to enter it here. Anything works — a concept, a scenario, and more. If you have a logo file, reference links, or a guideline file, please attach them too.
Add file / linkStep 2. Choose an AI-recommended concept
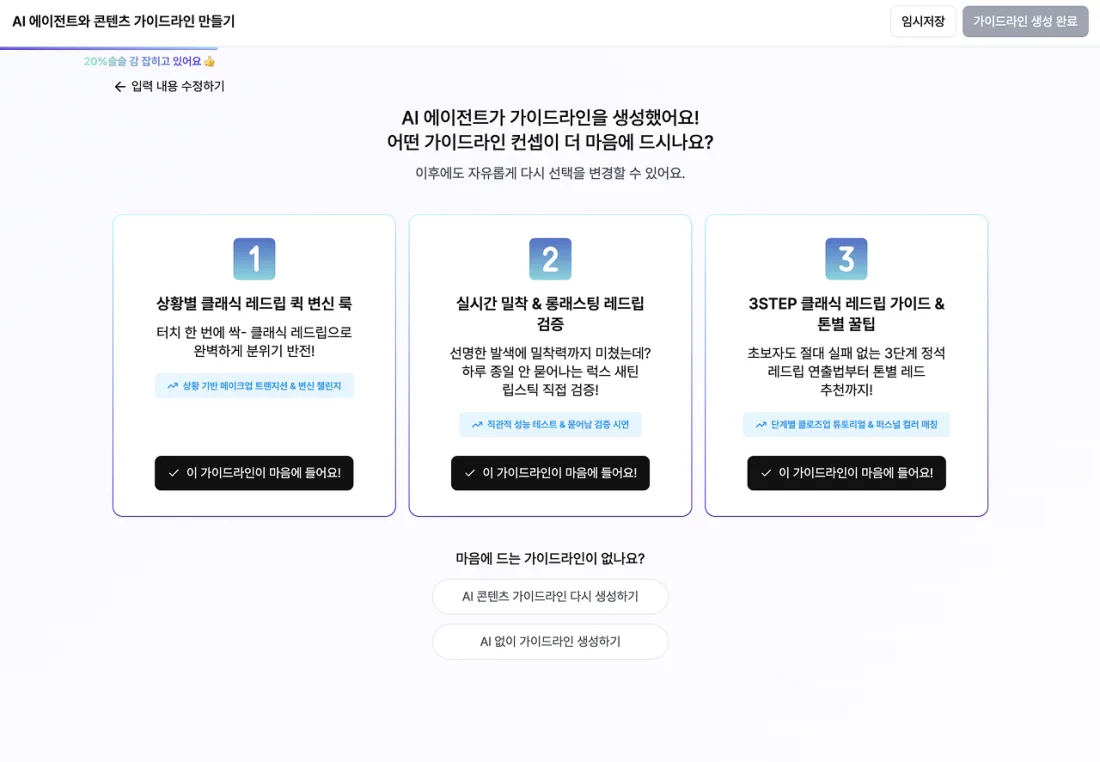
- Based on the basic information, AI suggests 3 tailored content concepts.
- Pick the direction that best fits your brand. You can change your choice later.
- If none of the concepts work for you, use [Regenerate AI content guidelines] or [Create guideline without AI].
Expand screen preview · Choosing an AI agent-recommended concept
The text below is an example of the UI copy shown on the actual screen.
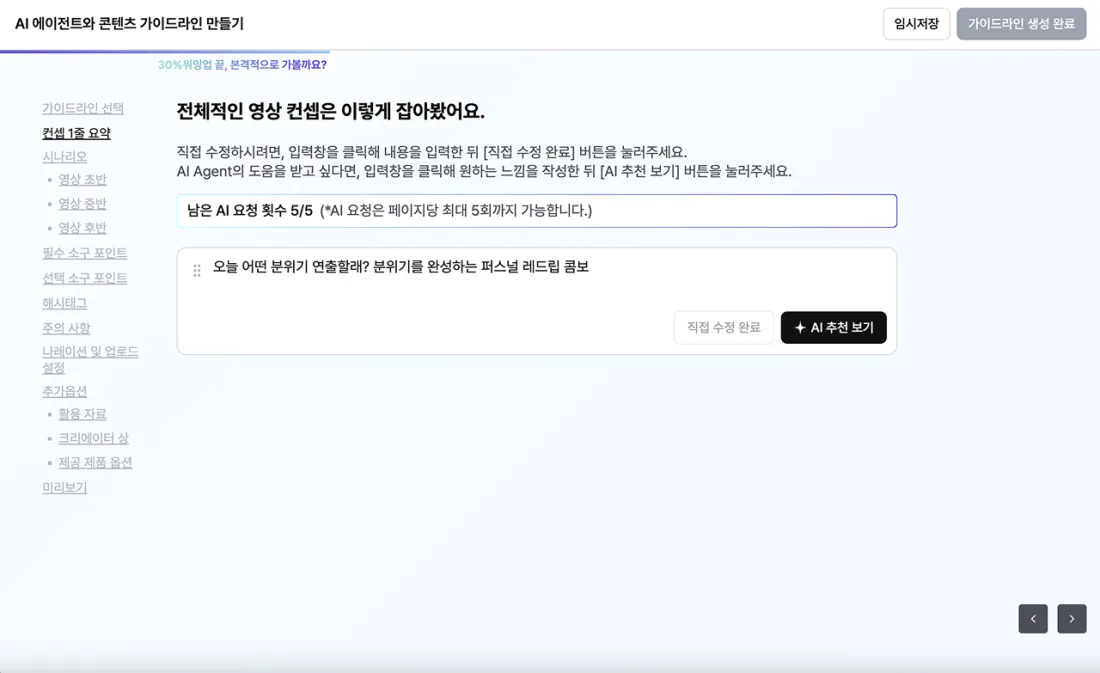
Step 3. After choosing a concept, click [View full content guideline] to open the detailed editor. You can write scenes yourself or design them together with AI.
What you can do in the editor
- Write it yourself: enter your message and creative direction, then click [Done editing] to save.
- Generate an AI draft: enter your concept and key message, then click [See AI suggestions] to generate a scene structure and draft.
- Expand scenes: add follow-up scenes with [Add scene] or [Ask AI to add a scene].
Expand screen preview · AI guideline editor
The text below is an example of the UI copy shown on the actual screen.
Design your content guideline with AI
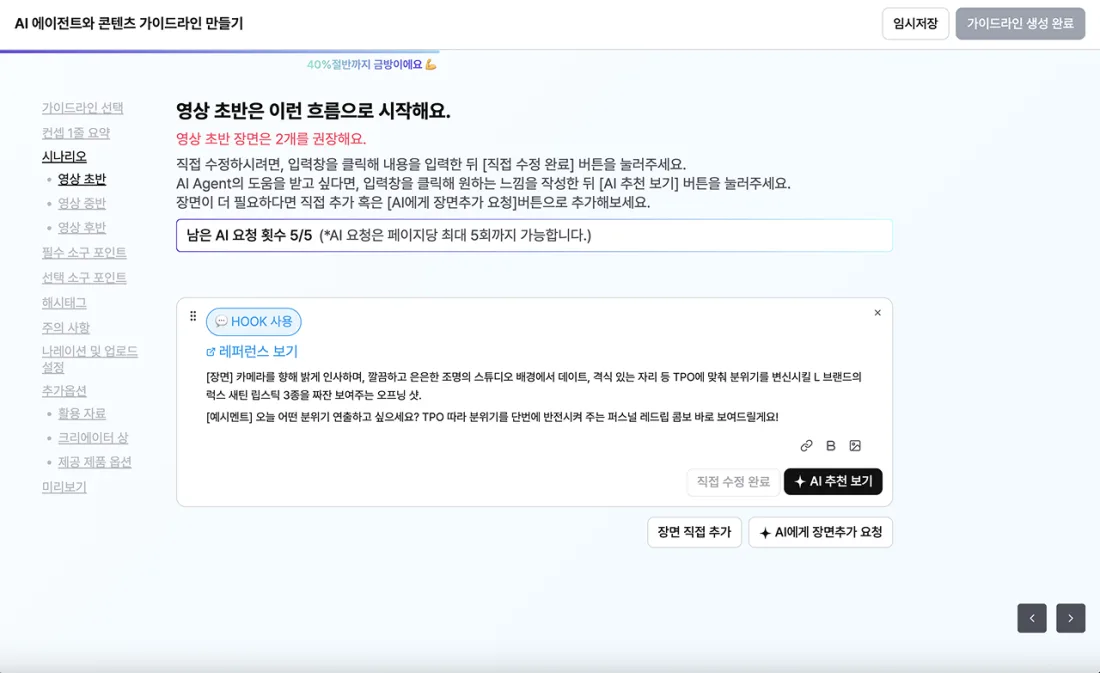
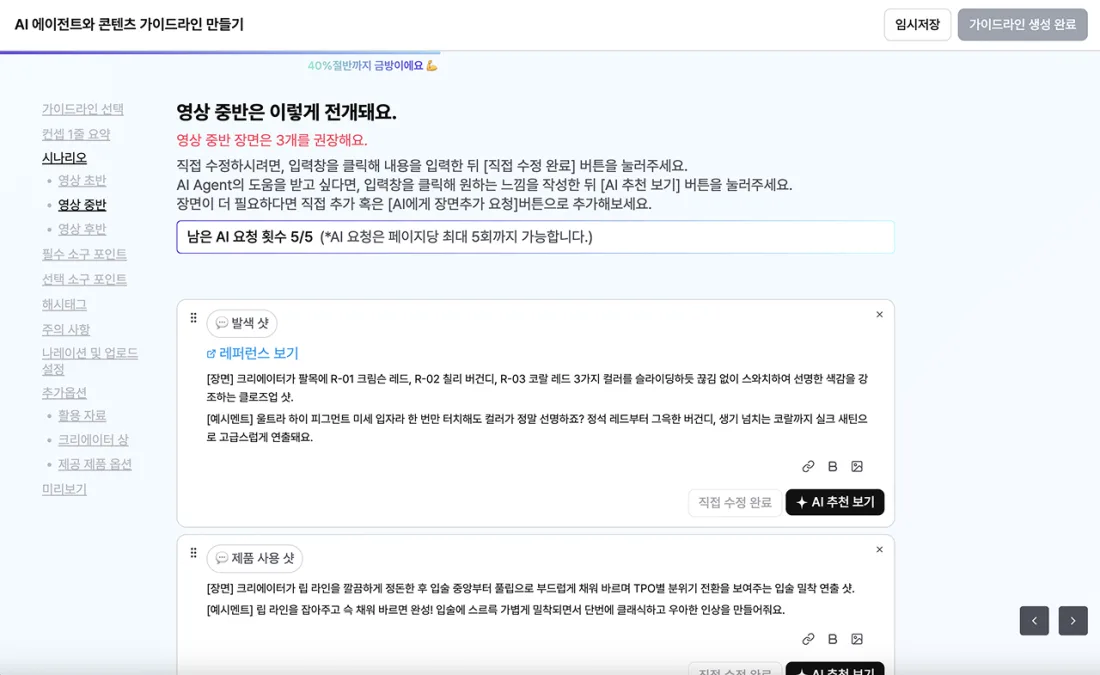
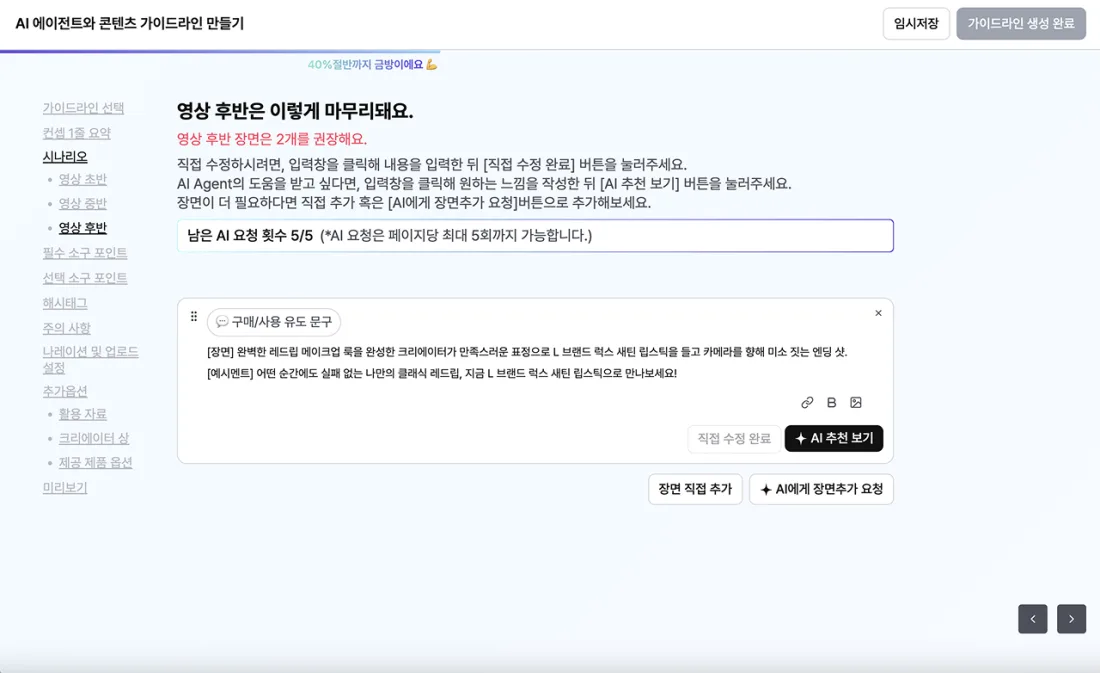
You can write each scene (HOOK, Start, Mid, End) yourself, or design the content guideline together with the AI Agent. AI analyzes your brand direction and the short-form context to automatically suggest scene structure, message flow, draft copy, and extra ideas.
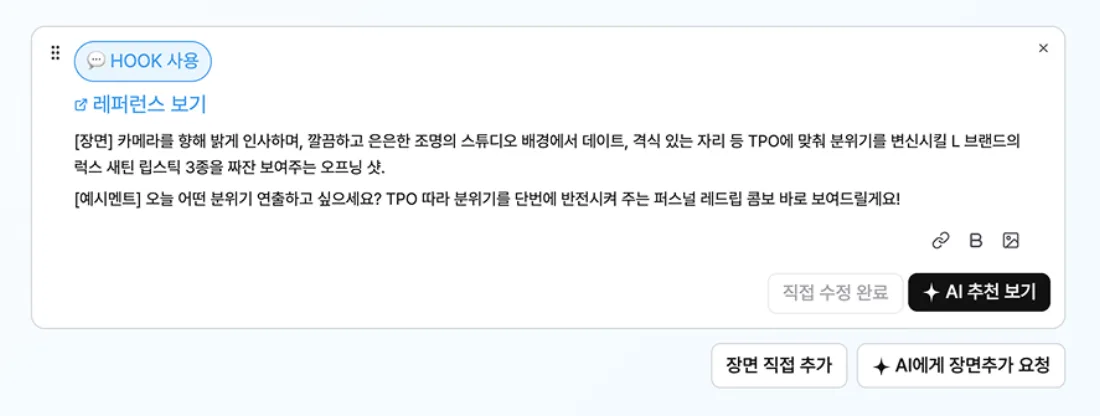
- • Write it yourself : Enter the message and creative direction your brand wants to convey and write the content guideline freely. Click [Done editing] when you're finished to save it.
- • Generate an AI draft : Enter your concept, key message, and more, then click [✦ See AI suggestions] — the AI Agent automatically generates a scene structure and content guideline that fit your brand goals.
- • Expand scenes and ideas : To enrich the content flow, build scenes yourself with [Add scene], or use [✦ Ask AI to add a scene] to get follow-up scenes and ideas that connect naturally to your existing story.
| Guideline section | What to check and edit |
|---|---|
| One-line concept summary | Defaults to the phrase you chose in Step 2. Edit it to match your marketing direction. |
 | |
| Scenario (Start of video) | Check and edit the opening and lines that grab attention within 3 seconds. |
 | |
| Scenario (Mid video) | Review the main section, such as key benefits and texture shots. |
 | |
| Scenario (End of video) | Check the ending, including the call to action (CTA) and logo placement. |
 | |
| Required selling points | Confirm the core strengths that must appear in the content. |
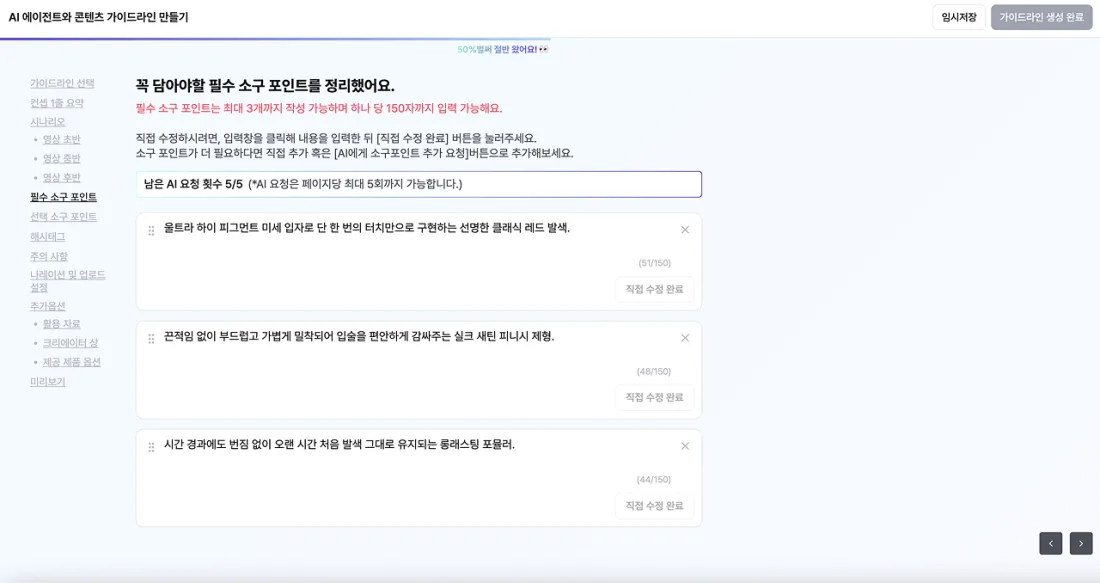 | |
| Optional selling points | Review supporting points creators can choose from to suit their channel. |
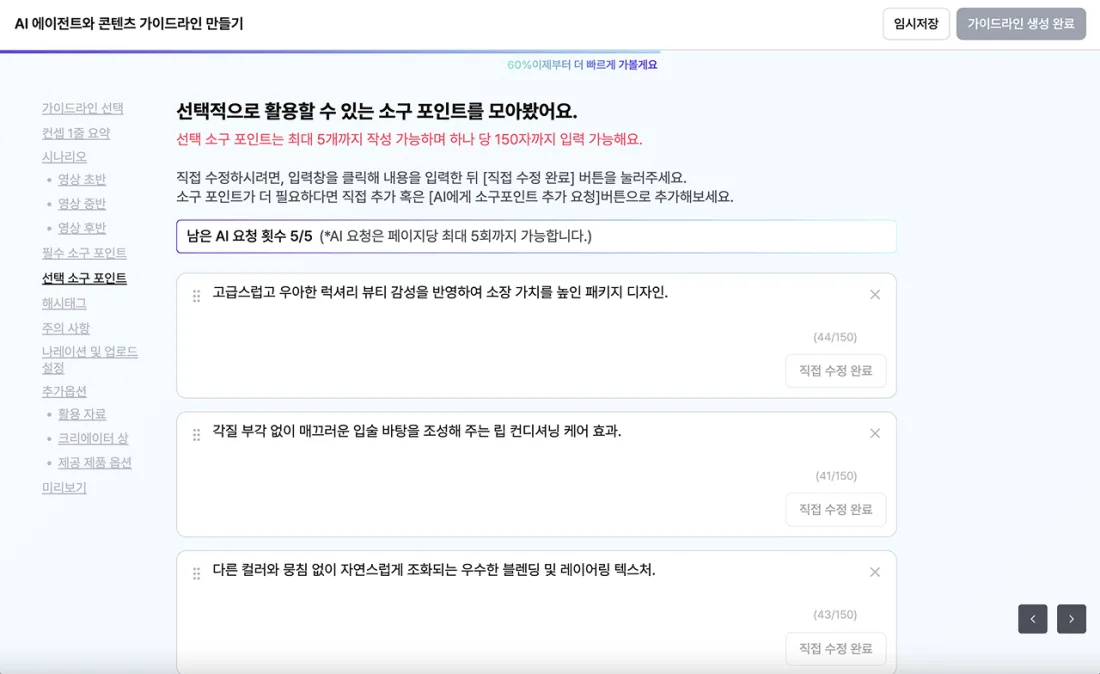 | |
| Hashtags | Specify the hashtags that must be included in the caption. |
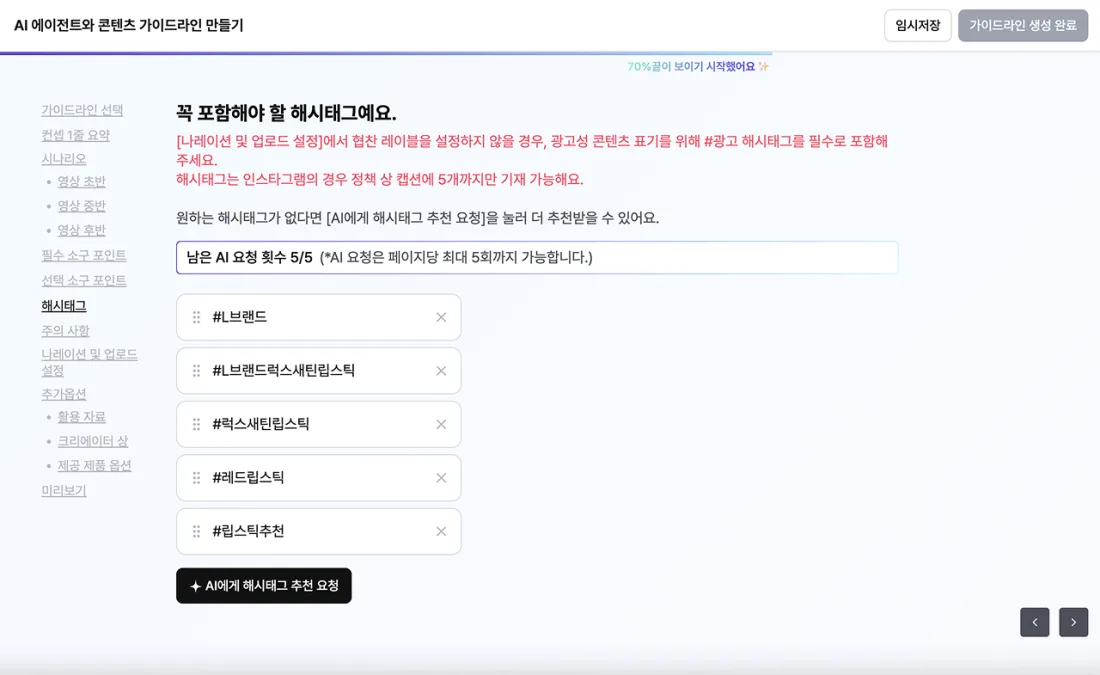 | |
| Precautions | For regulated categories such as diet or finance, note what must be followed in filming and subtitles. |
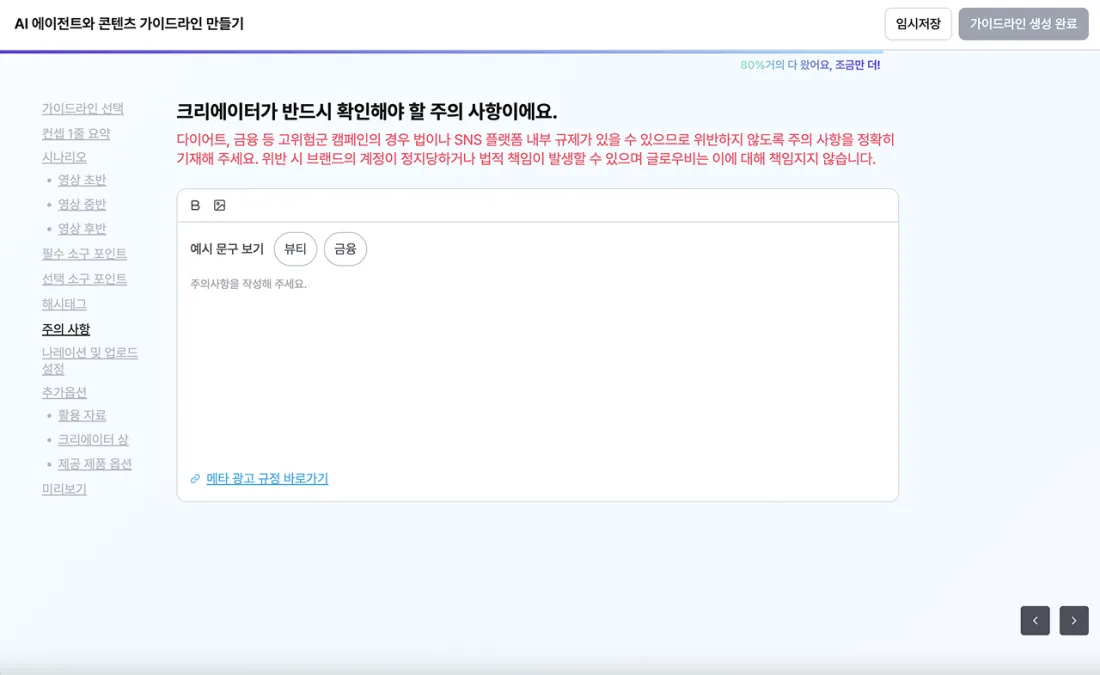 | |
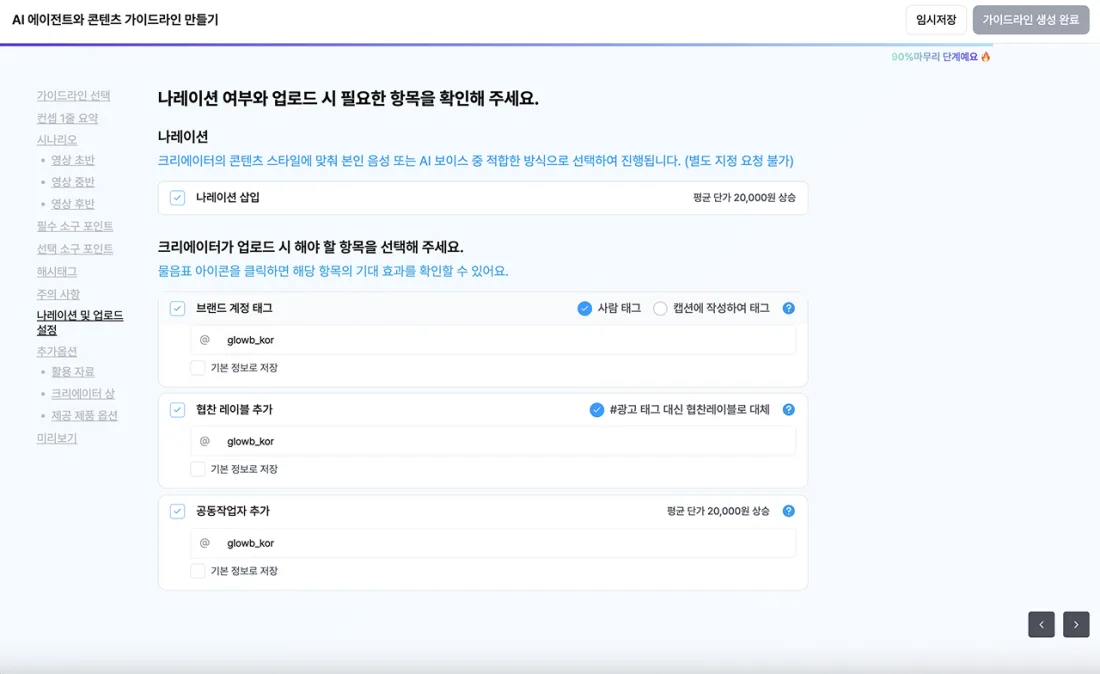
| Narration and upload settings | Set narration, how to tag the account (people tag / caption ID), the paid partnership label, and collaborator requests. |
 | |
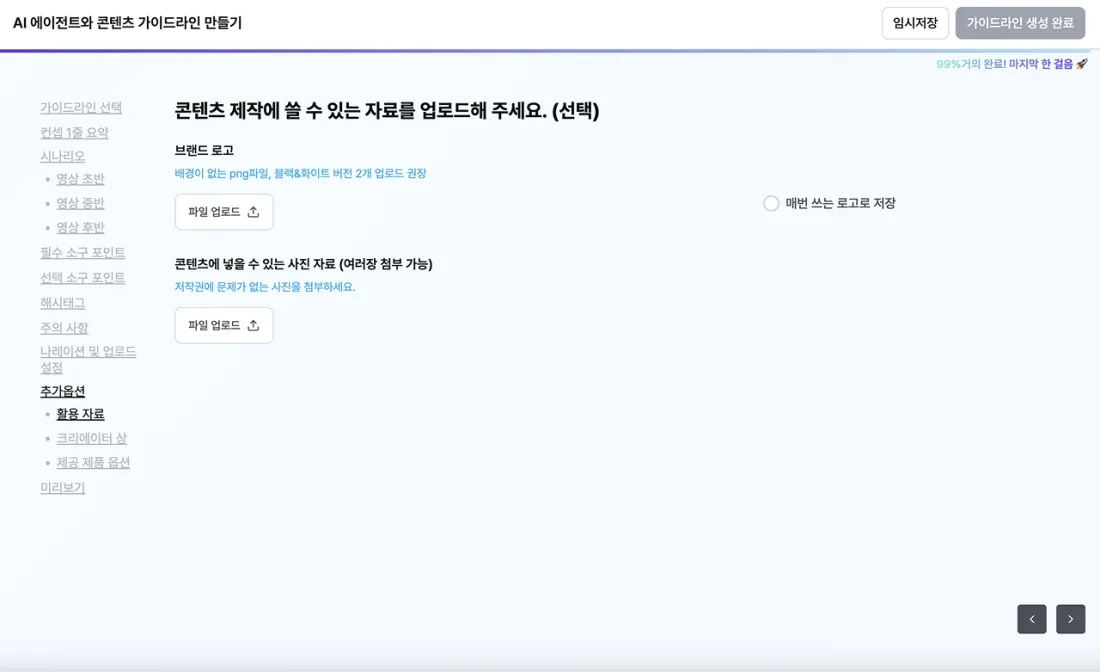
| Add-ons (assets) | Attach your logo file and any materials that can be used in the content. Please respect copyrights. |
 | |
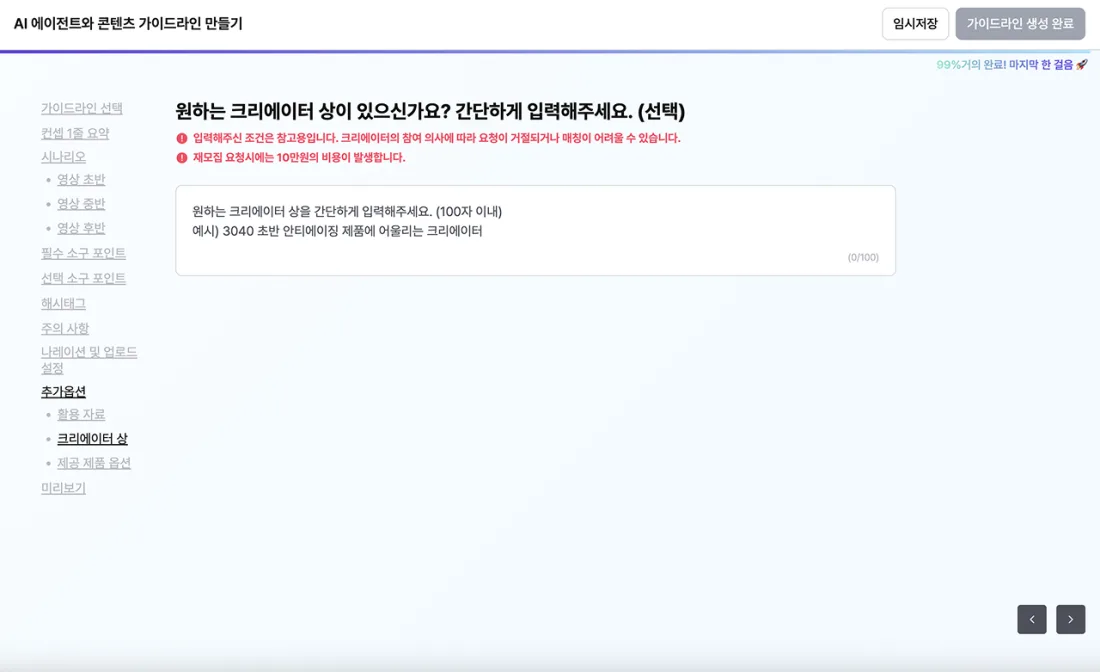
| Add-ons (preferred creator profile) | Quantitative and qualitative guidance for AI recruitment and negotiation. e.g. 100K+ followers, a creator who suits anti-aging for people in their 30s–50s |
 | |
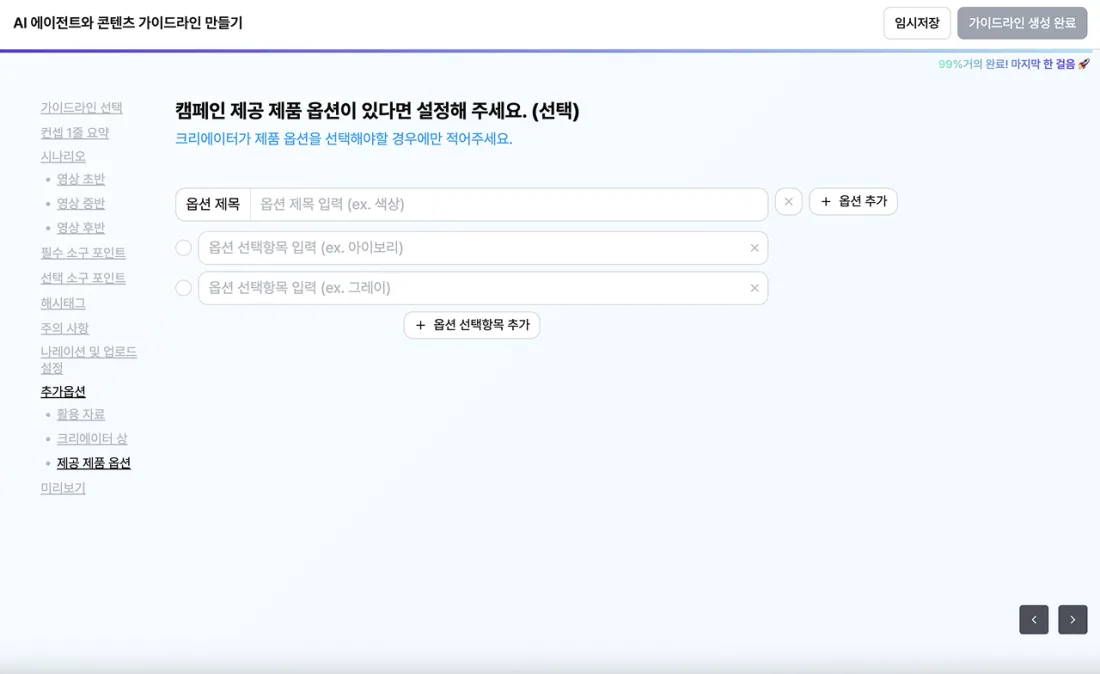
| Add-ons (product options) | If there are options such as color or size, enter the specs so creators can choose before shipping. |
 | |
Step 4. Finalize the guideline and check the expected schedule
- Click [Complete guideline] to start creator recruitment.
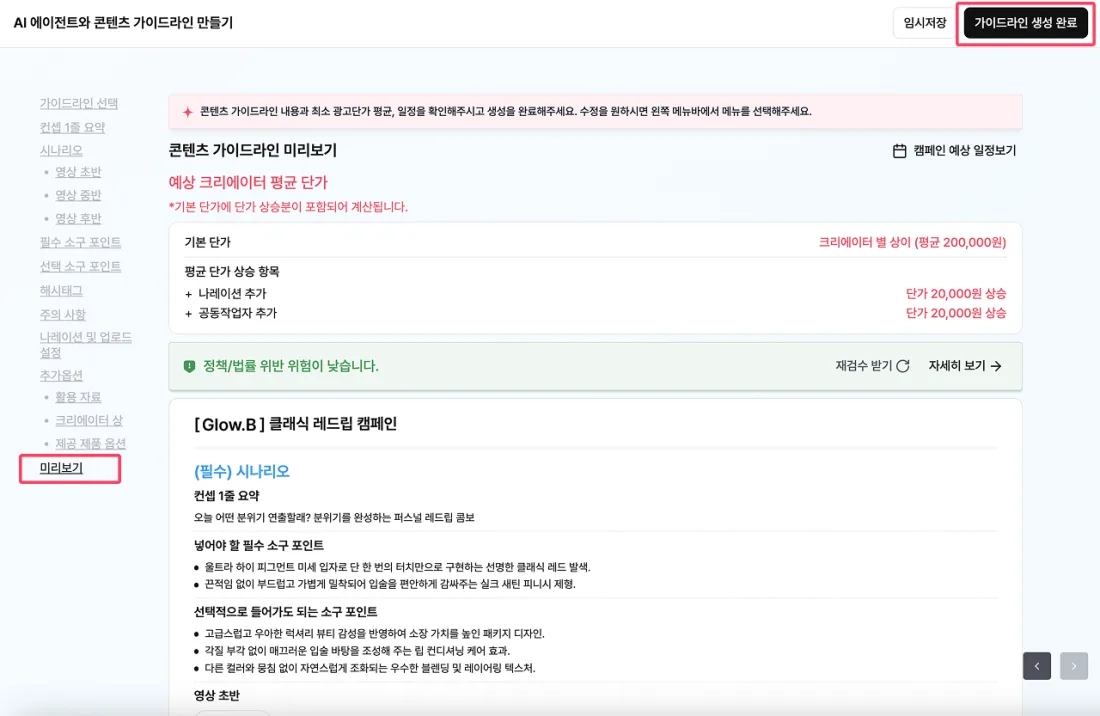
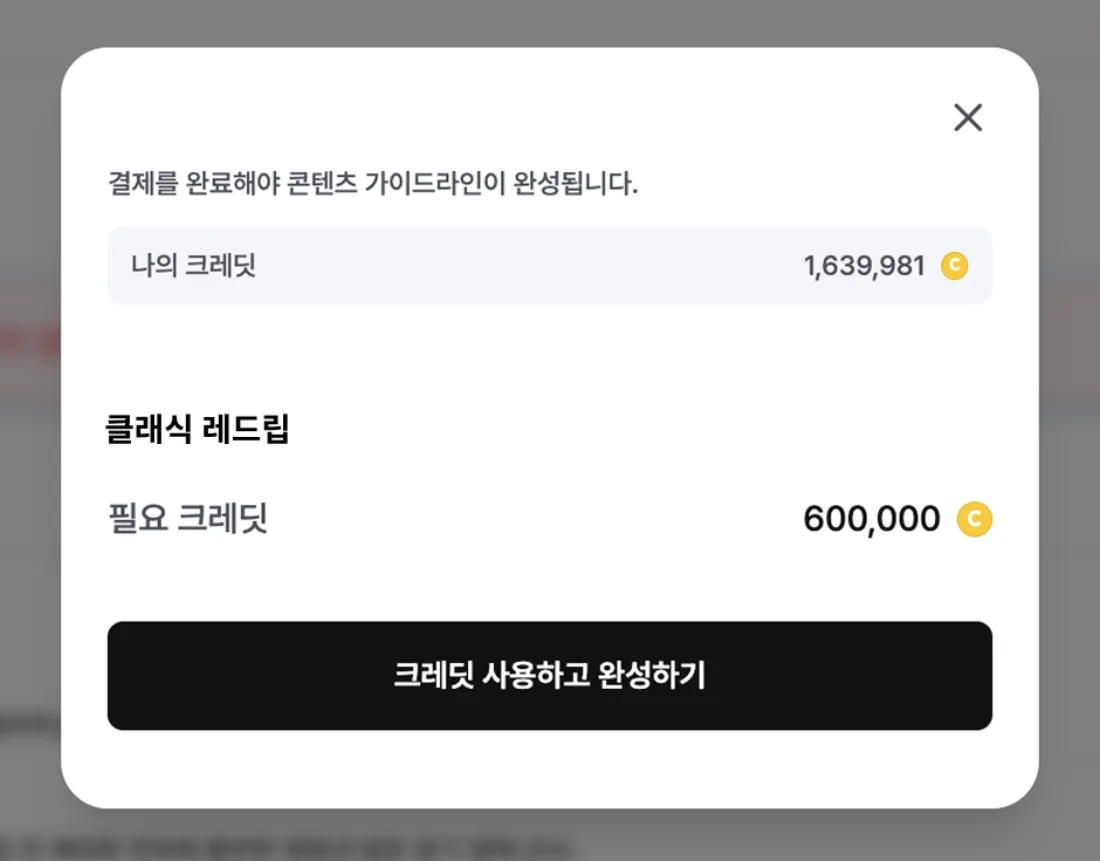
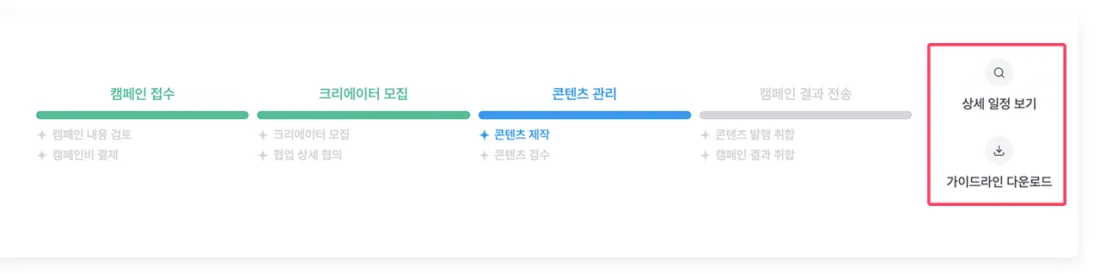
- Check progress in the dashboard, and open the campaign to use [View schedule details] and [Download guideline] for a PDF.
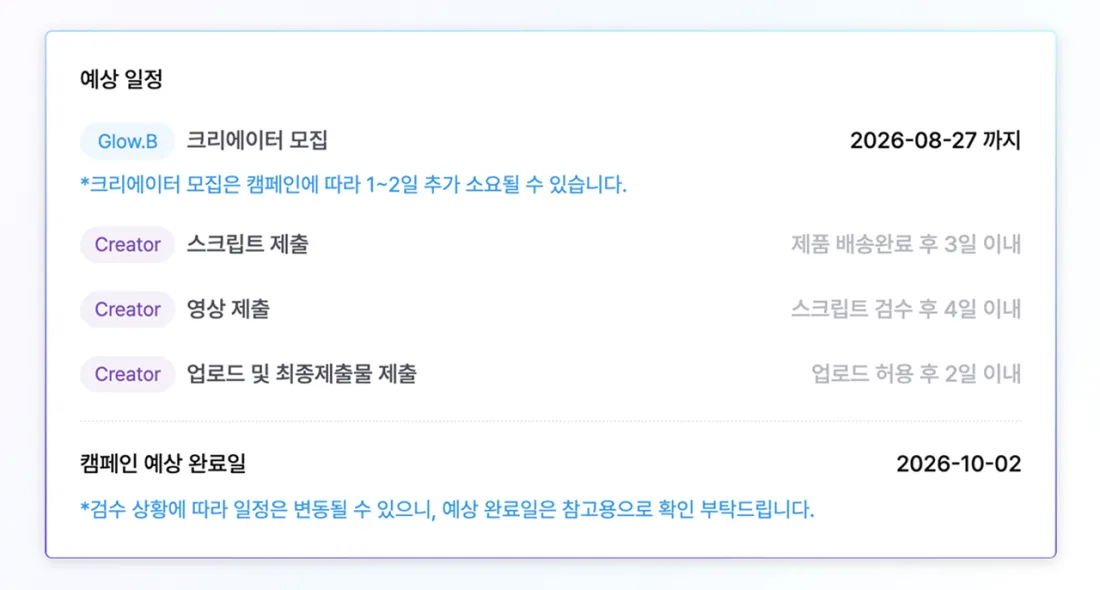
- For reference: the list is delivered after recruitment, scripts are due within 3 days of delivery, videos within 4 days of delivery, and upload and final submission within 2 days of upload approval.
- The schedule may change depending on the review process.
Expand screen preview · Checking the expected schedule
The text below is an example of the UI copy shown on the actual screen.
Important
Your content guideline must be finalized before creator recruitment. Once recruitment starts, changes to the conditions may be difficult, so please review everything carefully before saving.
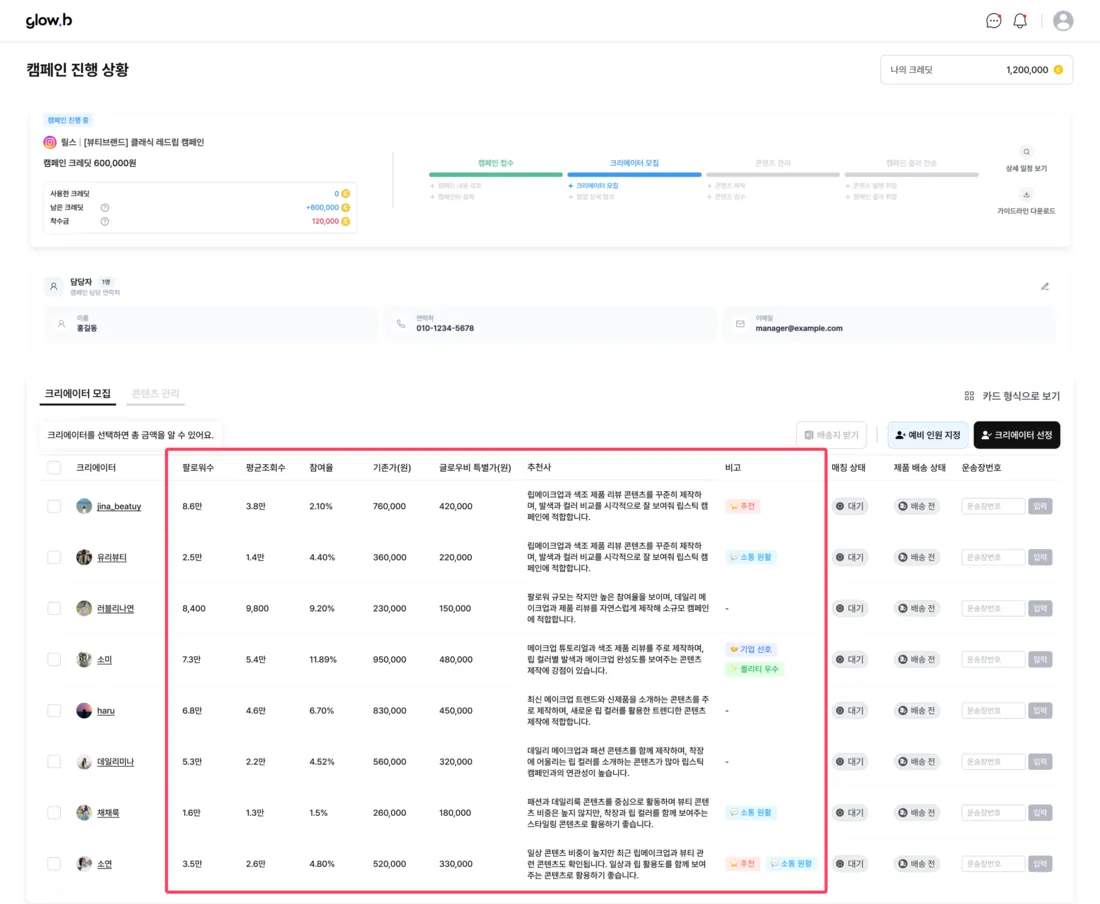
In this step, you review the list of creators AI has shortlisted for your campaign conditions and decide on your final lineup.
Before the shortlist is ready
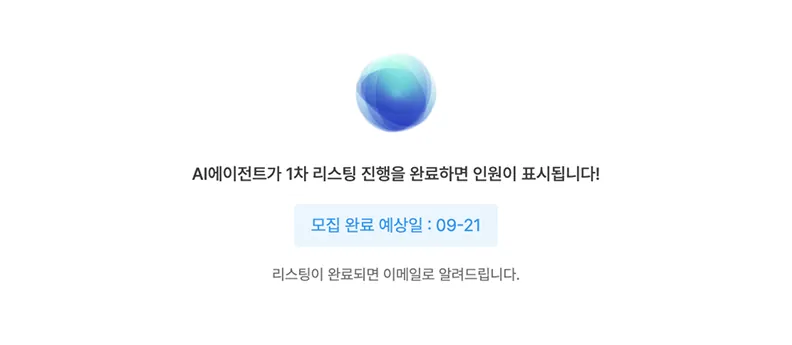
The dashboard shows “The number of creators will appear once the AI agent finishes the first round of listing!”, along with the expected recruitment completion date and a note that you'll be emailed when it's done.
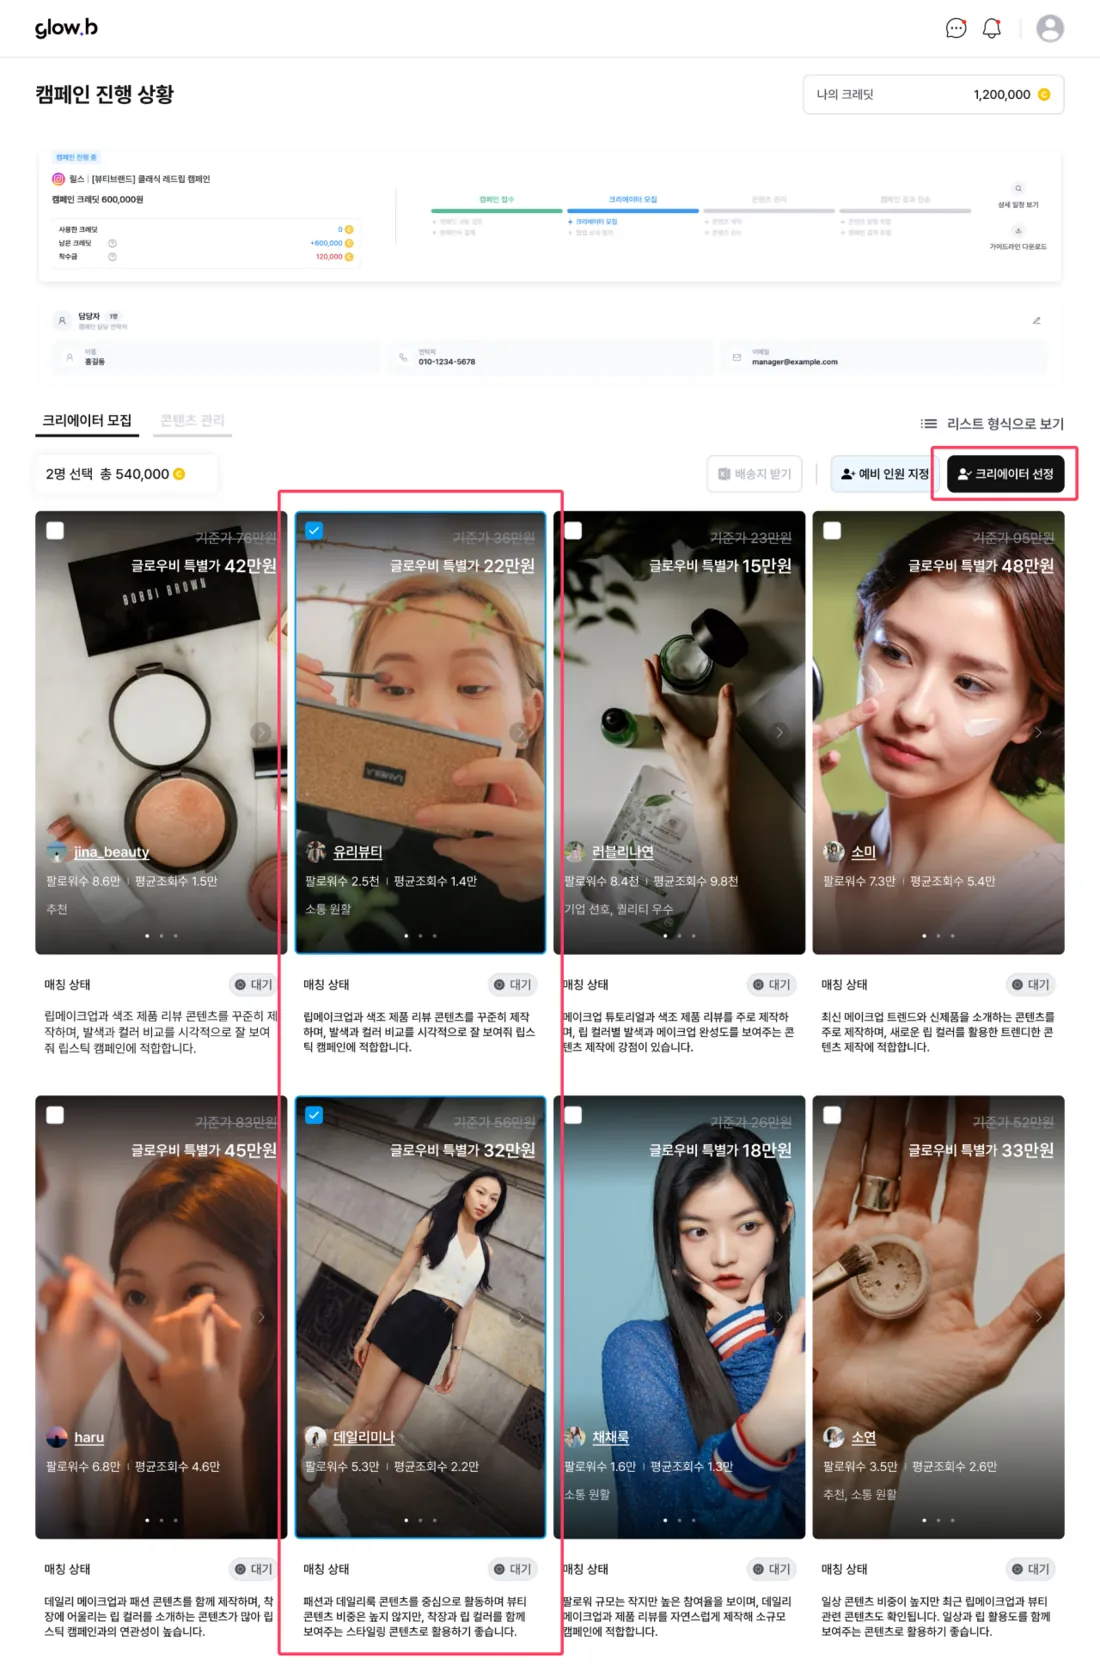
| Information provided | How to use it |
|---|---|
| 3 recent Reels | Preview each creator's style and tone. |
| Key channel metrics | Follower count and average views per post. |
| Matching rate | Compare the creator's standard rate with the special Glow.B member rate. |
| AI agent recommendation | A note on why the creator made the list and their qualitative strengths. |
Final selection and matching
- 1
Check budget and rates
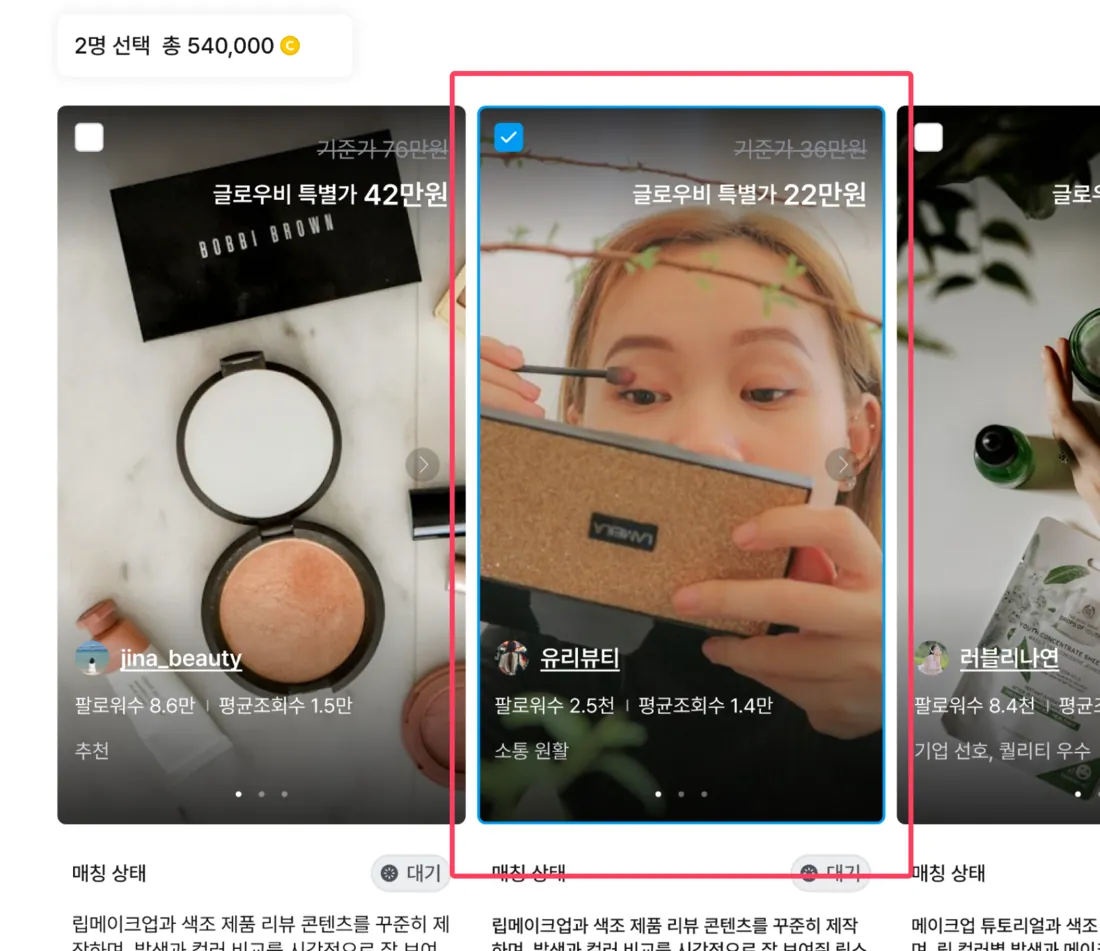
Review individual rates within your total budget and check off the creators you want.
- 2
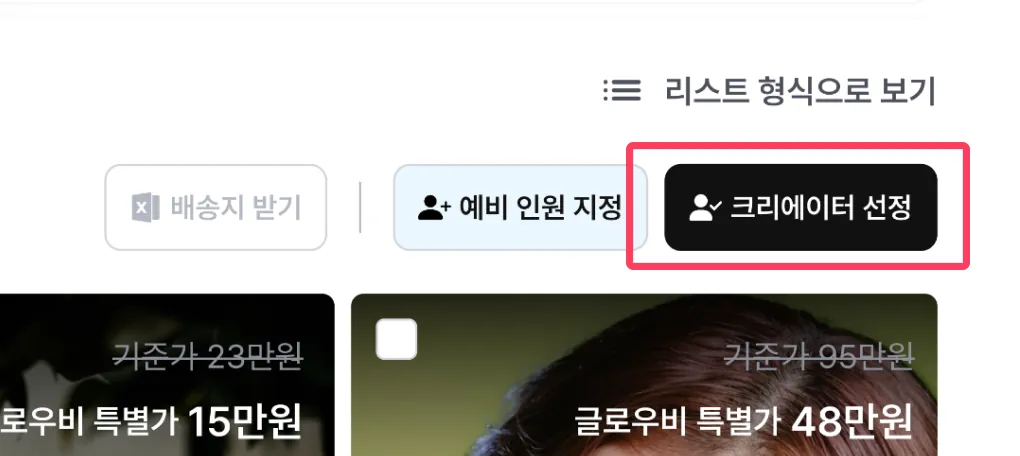
Click [Select creators]
Once you've made your selection, the creators are notified that they've been selected.
- 3
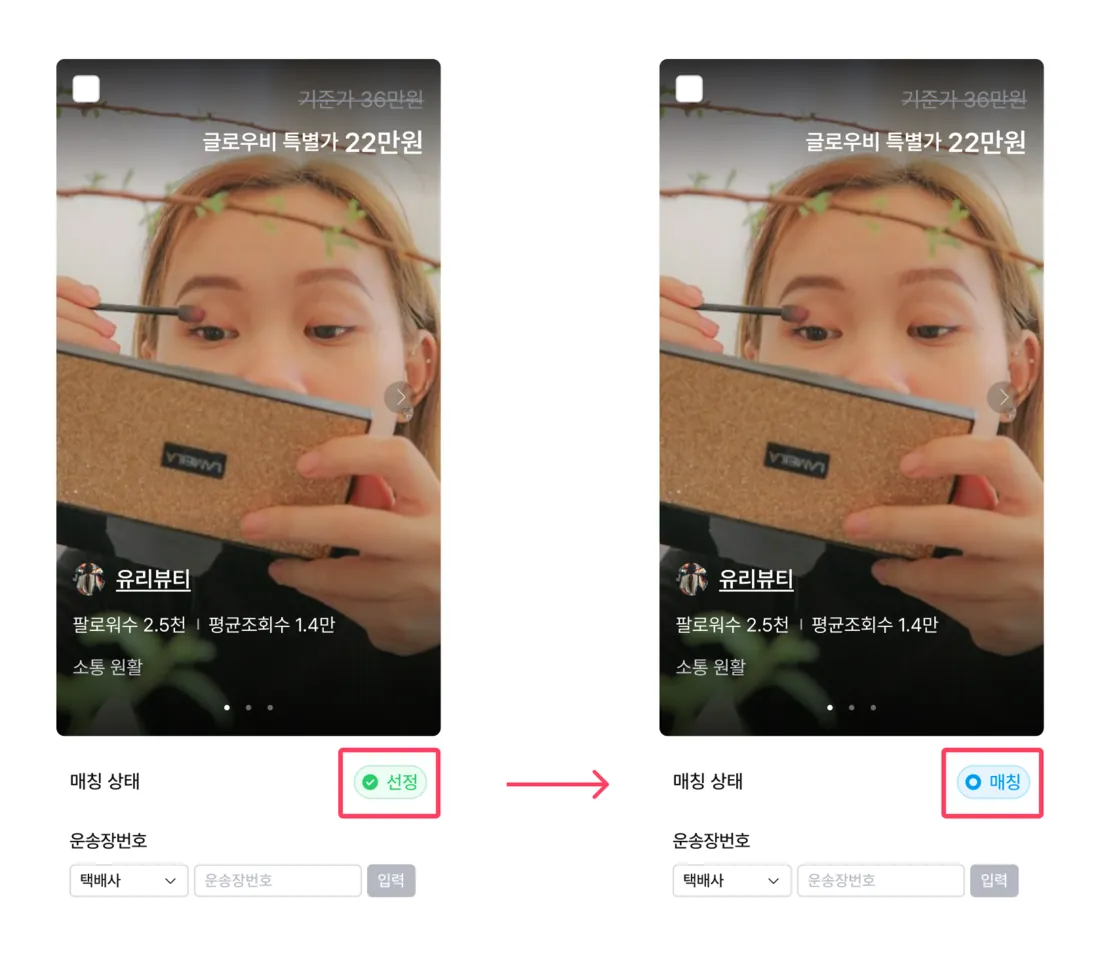
Contract signed and match confirmed
The match is confirmed once the creator signs the platform contract.
- 4
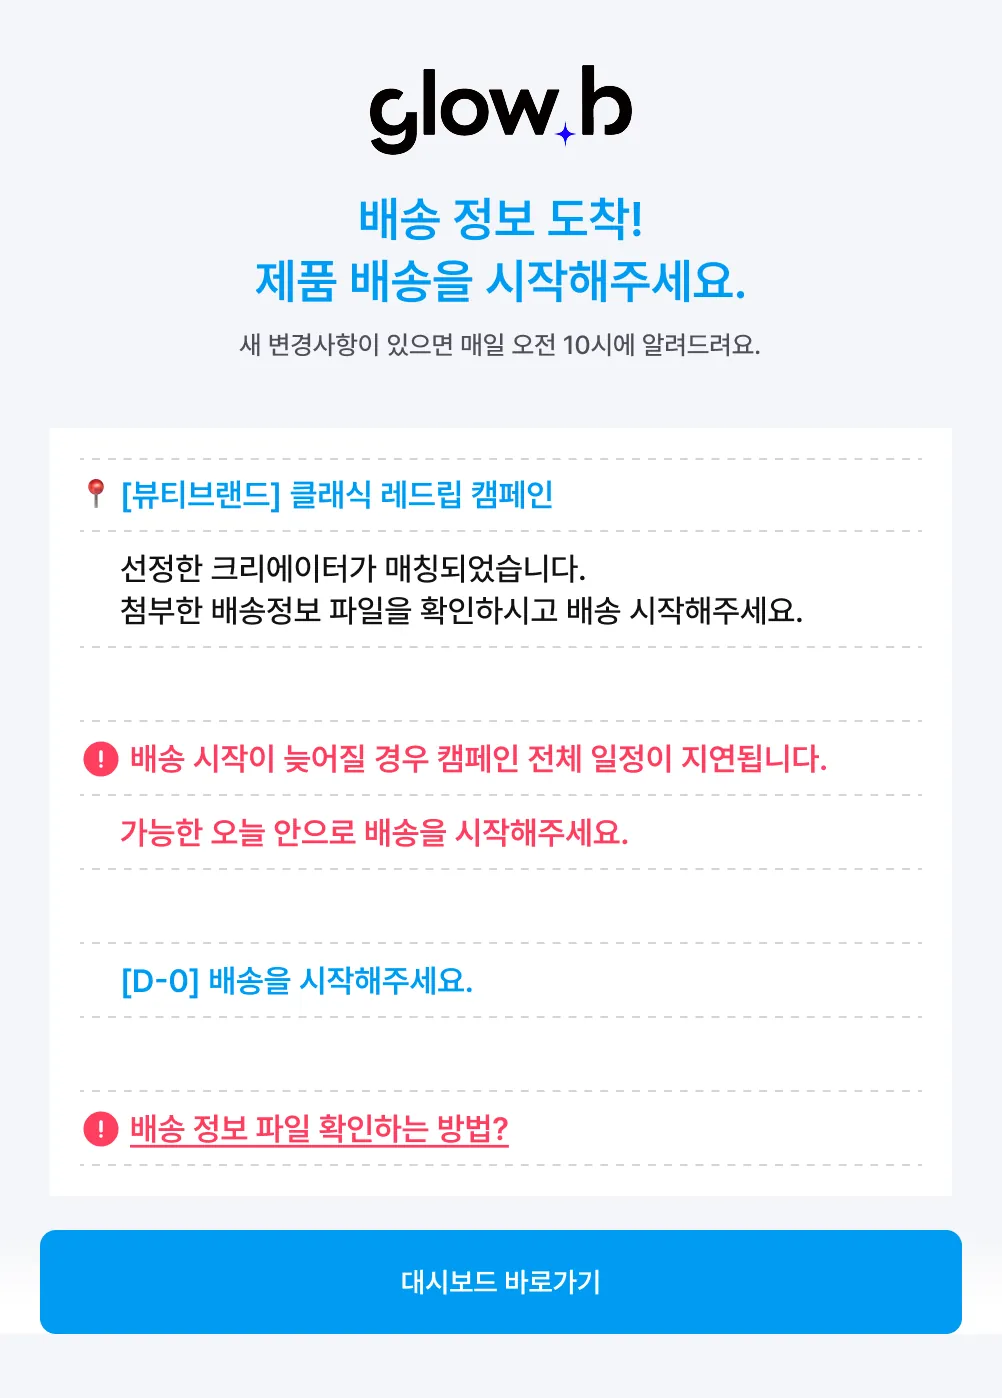
Receive campaign details automatically
Once participation and contracts are complete, the details you need are sent to the manager's email. For product-provided campaigns, shipping information is included.
In this step, you help matched creators produce content that follows the guideline, review their submissions, and request the final upload.
| Stage | What the brand checks and does |
|---|---|
| Enter shipping details | For product-provided campaigns, enter the courier tracking details for each creator. |
| Wait for content submissions | You'll get an email at the designated manager address when work is submitted. |
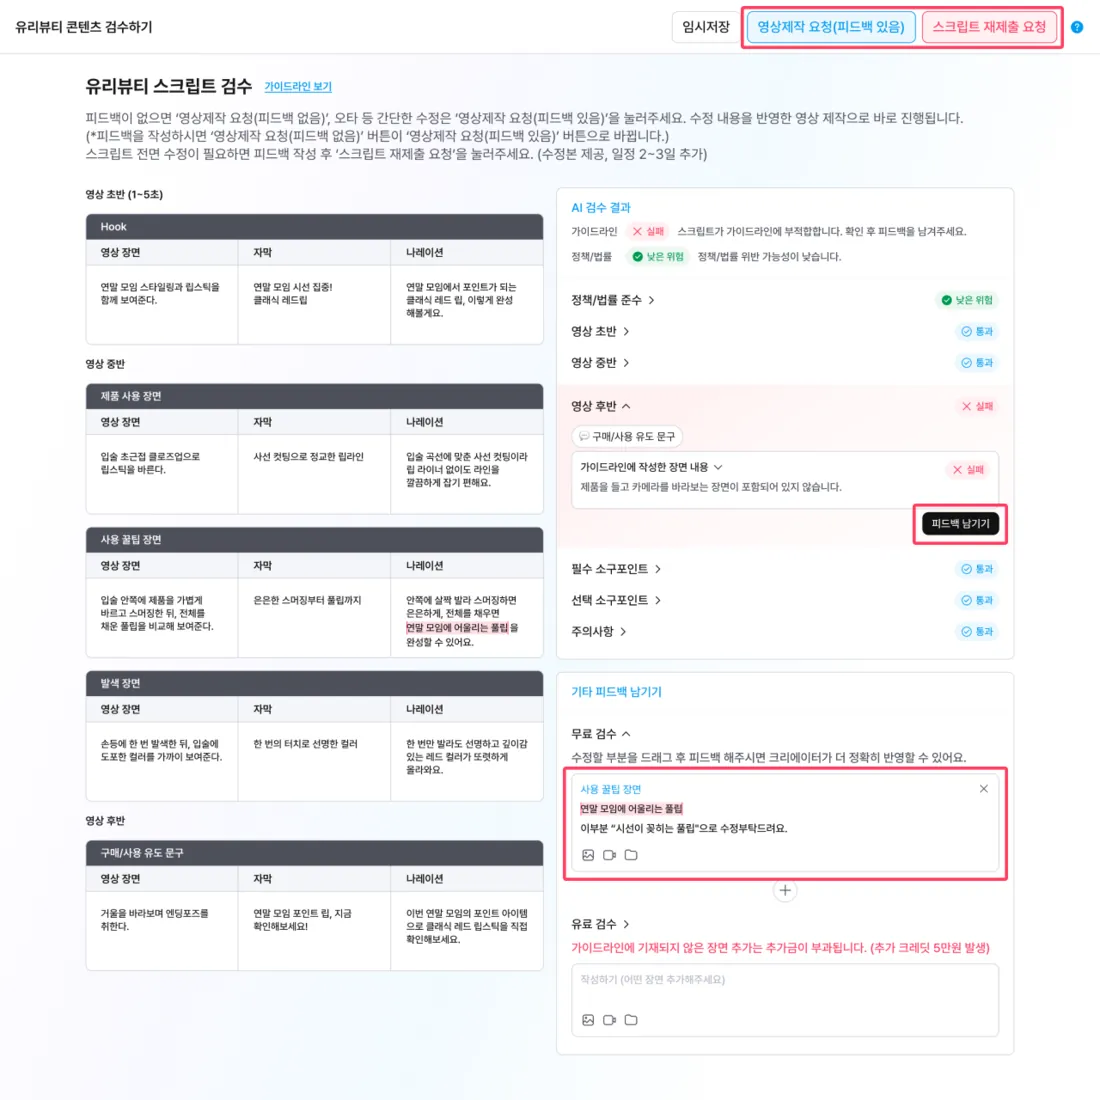
| Script review | Review the submitted script and choose whether to request video production or request a script resubmission. |
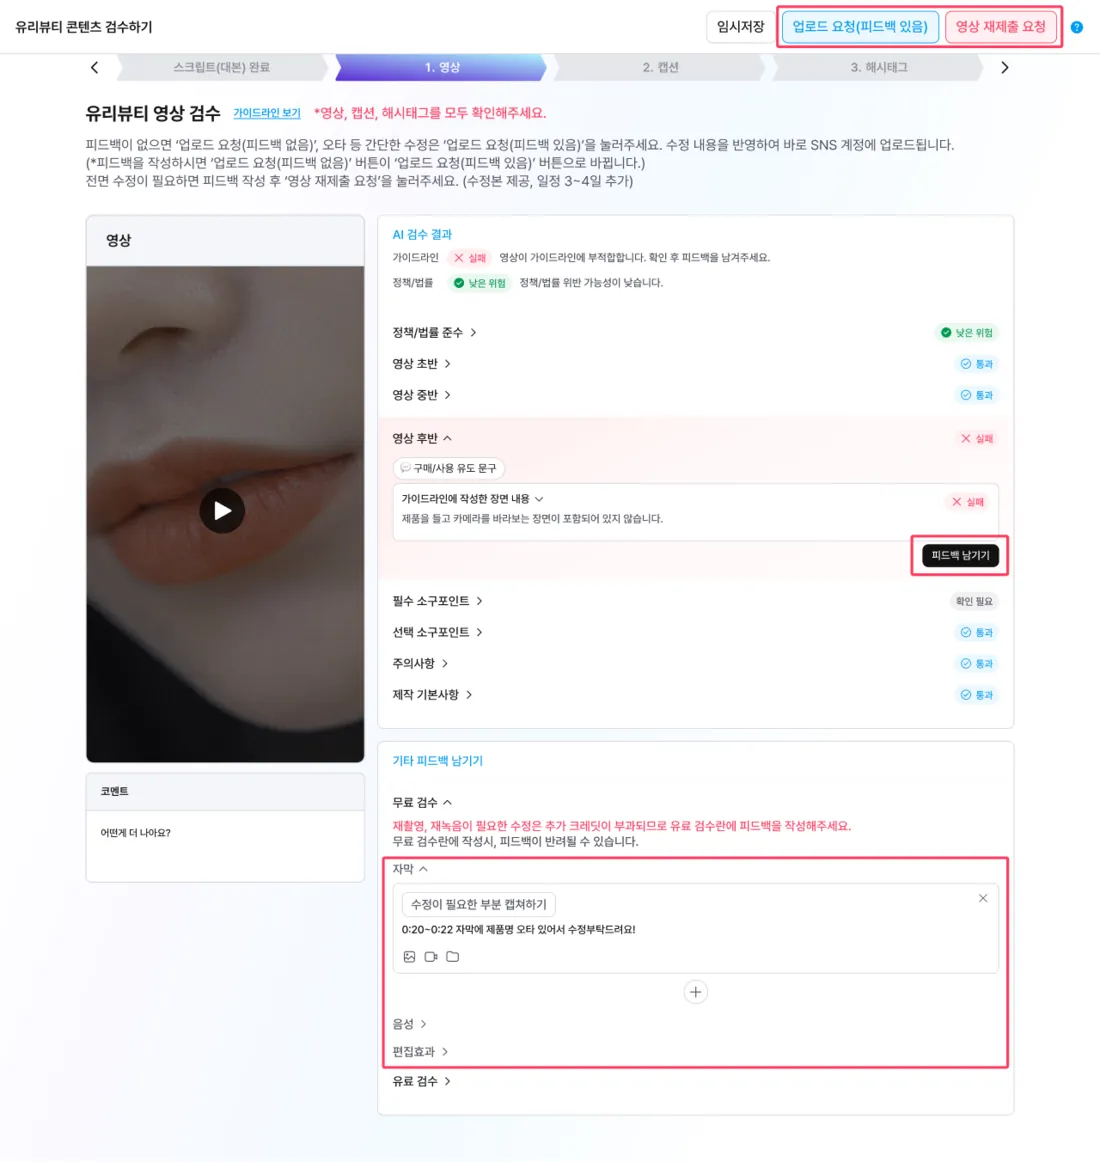
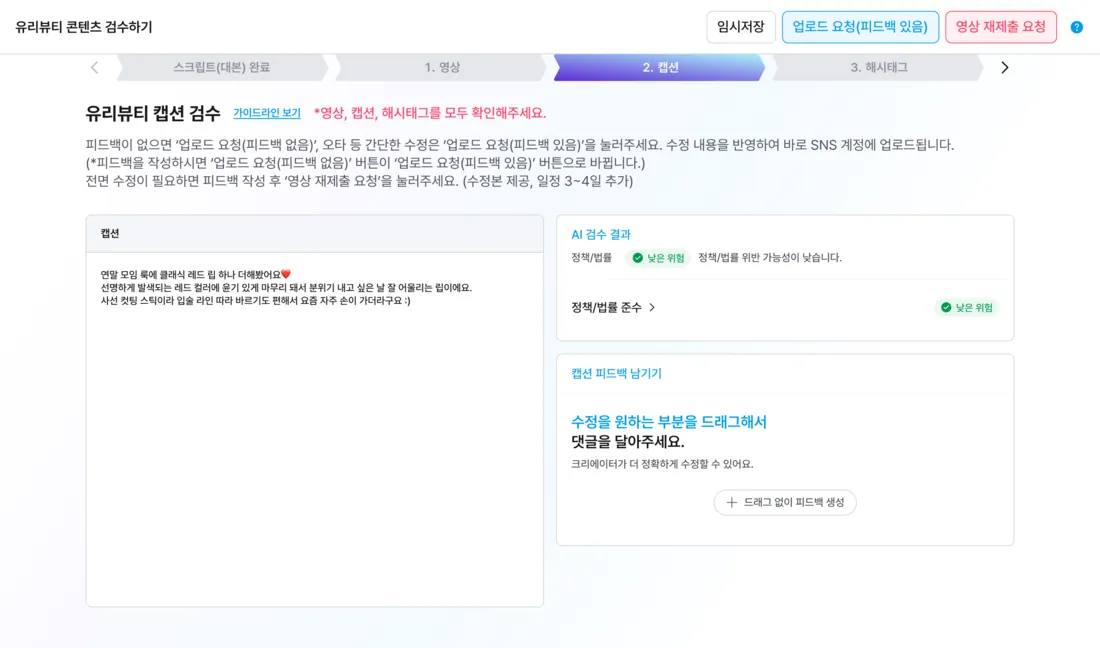
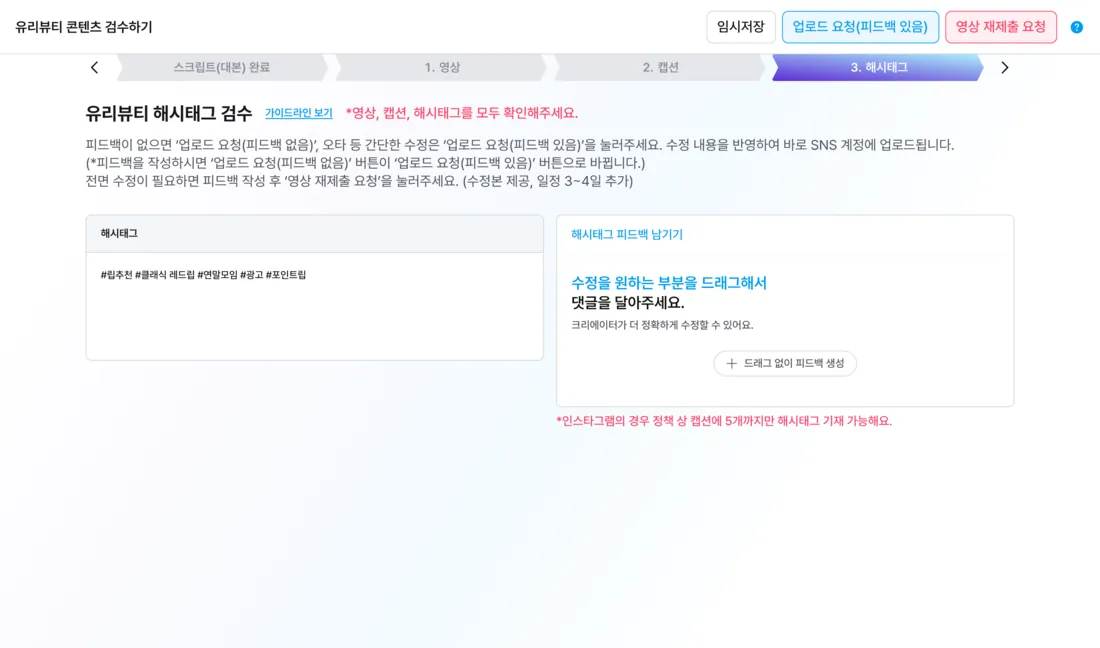
| Video, caption, and hashtag review | Review the video, caption, and hashtags before upload and confirm the upload schedule. |
Progress and review steps
- 1
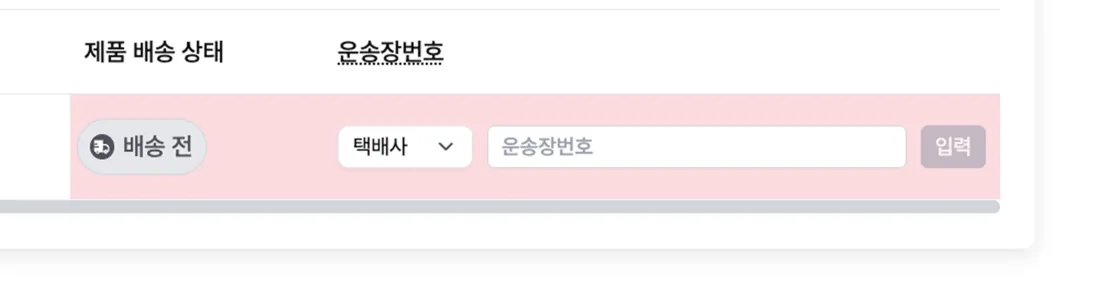
Enter shipping details
After shipping the product, enter the shipping details in the Creator recruitment tab of the dashboard.
- 2
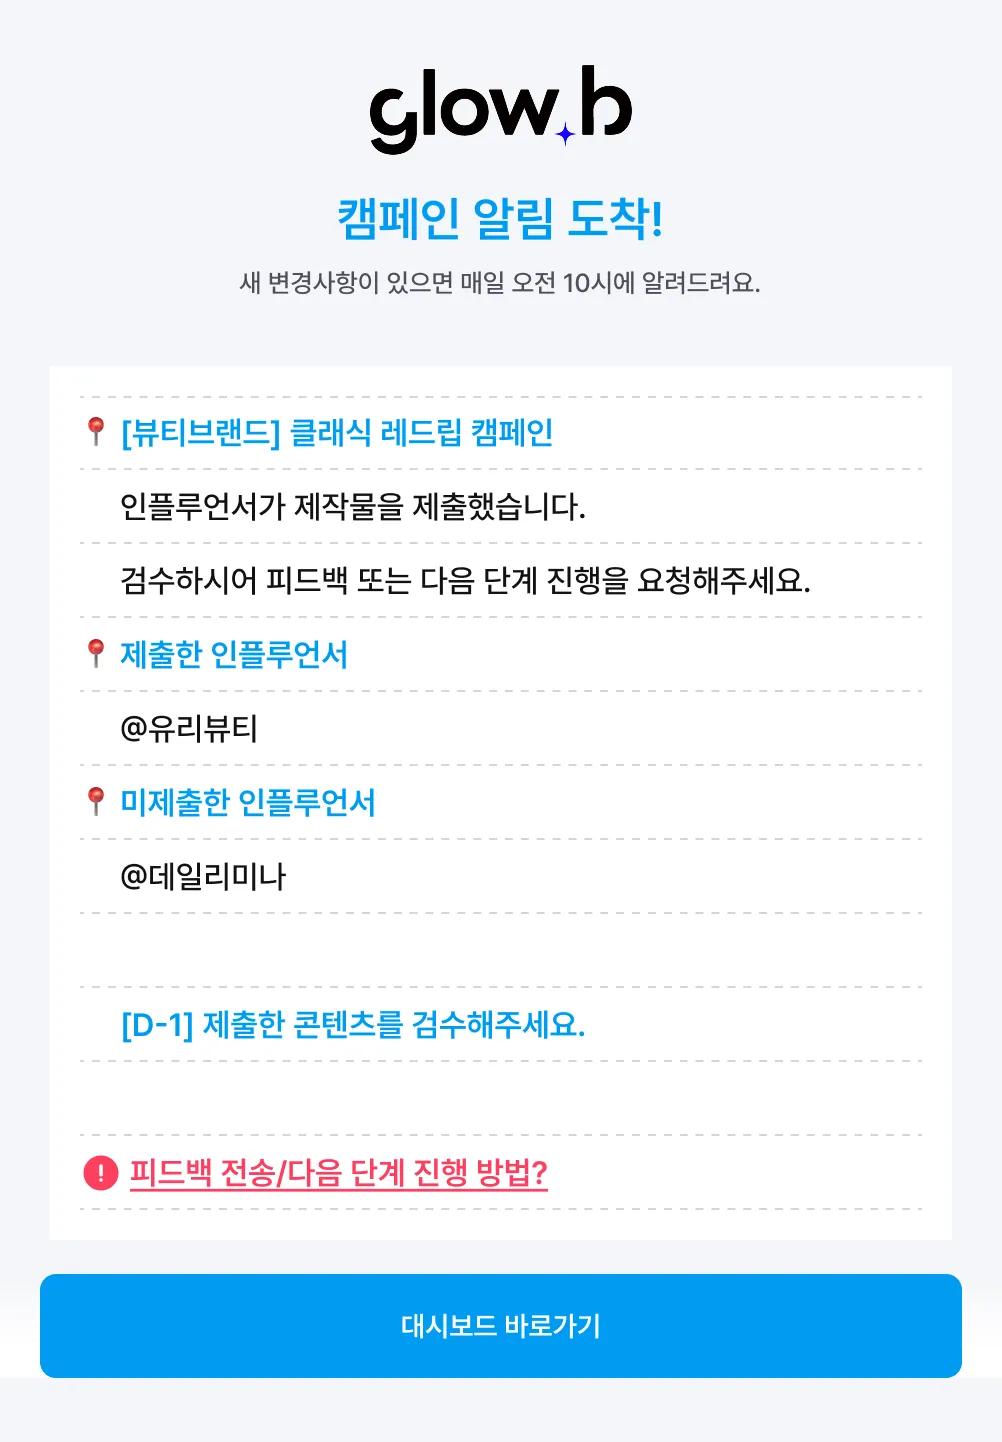
Check submission notifications
Check the submission notification sent to the manager's email.
- 3
Review the script
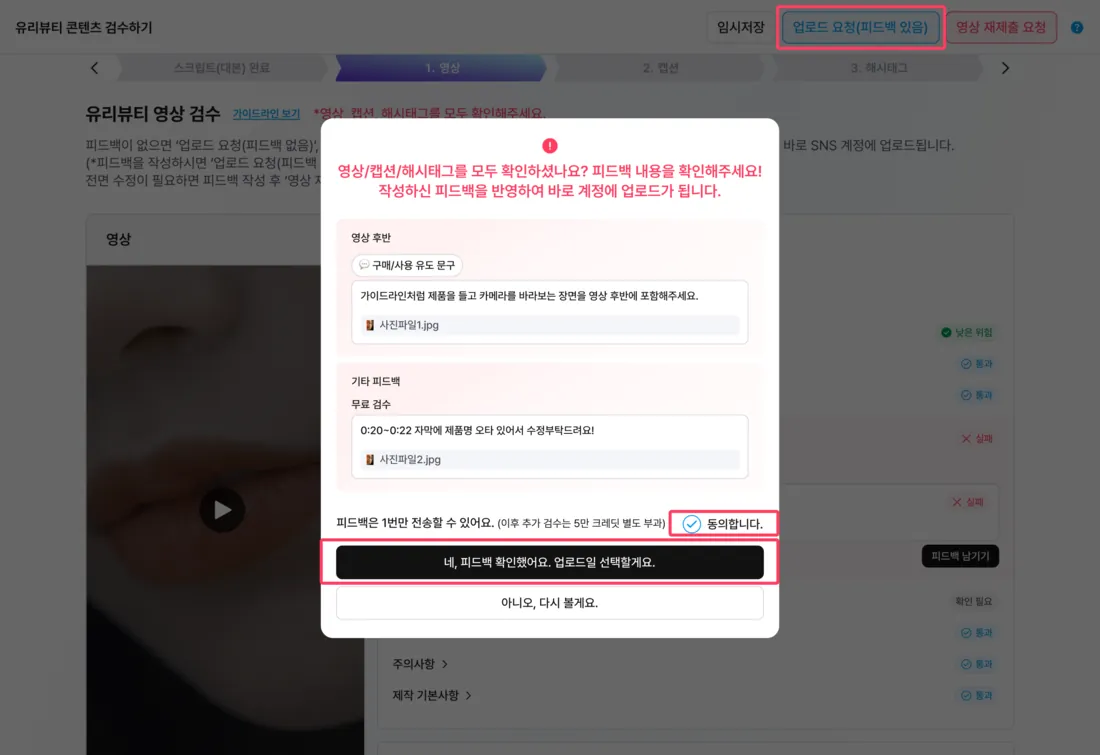
Review the script and the AI review results, write your feedback, and choose [Request video production] or [Request script resubmission]. (*For minor feedback, use [Request video production (with feedback)]. The creator will apply your script feedback and go straight to production.)
- 4
Schedule the final upload
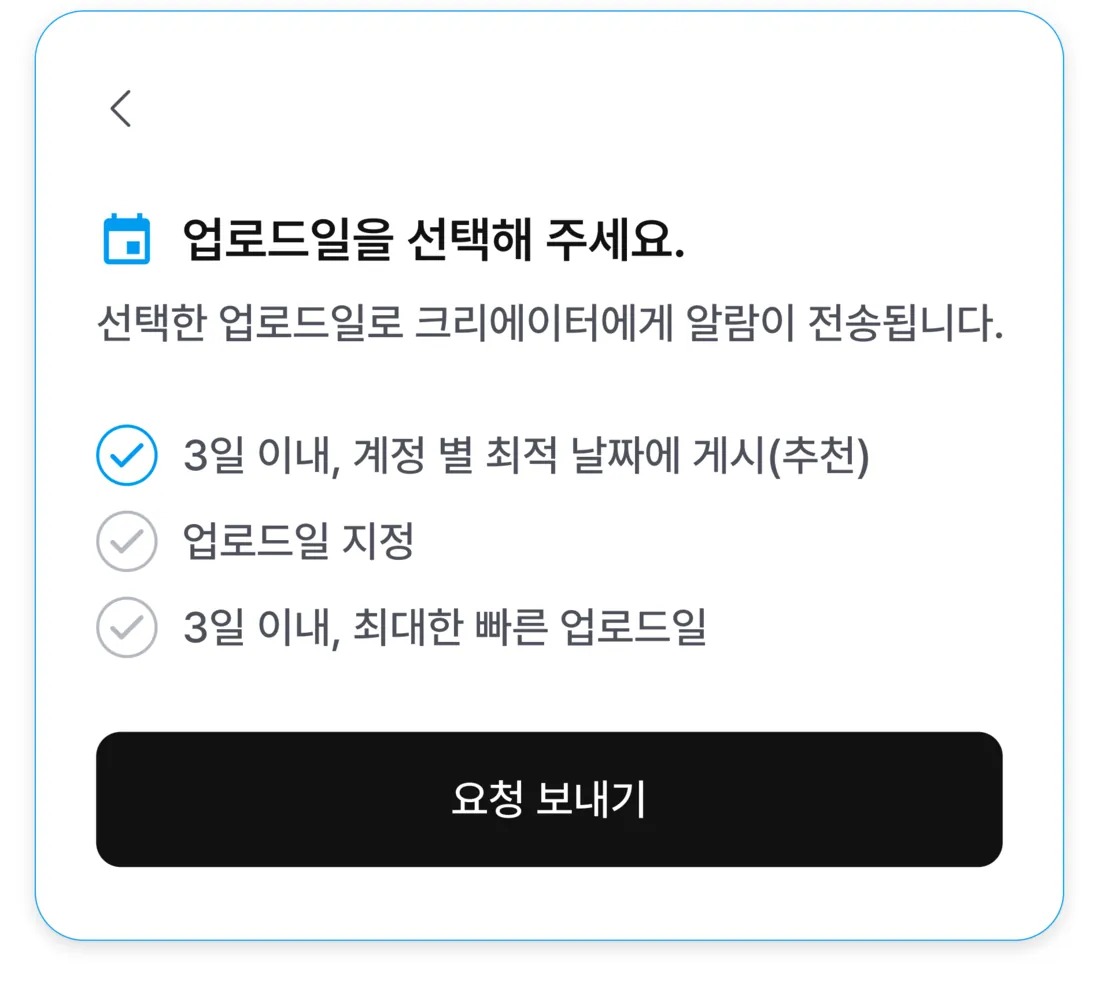
After reviewing the video, caption, and hashtags, choose an upload date and send your request.
Expand screen preview · Campaign progress and review screens
The text below is an example of the UI copy shown on the actual screen.
| Type | Policy details |
|---|---|
| Free review | Subtitles, cuts, reordering, etc. within the guideline (no extra cost) |
| Paid review | Reshoots, re-recorded narration, concept changes, etc. outside the scope (credits deducted) |
💡 Detailed guide
- In the [1. Script] tab, you can see the script the creator wrote and previous feedback.
- Clicking [Request upload] starts the upload right away; [Request video resubmission] may extend the campaign schedule.
| Review type | Policy |
|---|---|
| Free review | Subtitles, cuts, reordering, etc. within the guideline (no extra cost) |
| Paid review | Reshoots, re-recorded narration, concept changes, etc. outside the scope (credits deducted) |
Tips for the review screen
- In the Script tab, you can see the creator's draft and previous feedback.
- [Request upload] moves straight to upload, while [Request video resubmission] may extend the schedule.
- Review the video, caption, and hashtags tab by tab, and leave feedback by capturing or dragging.
- AI video review checks guideline compliance second by second.
Choosing an upload date
- Within 3 days, best date per account: uploads within 3 days of your request, at the time the account gets the best engagement.
- Set upload date (up to 3 days): pick the dates yourself to line up with an event or launch.
- Within 3 days, as soon as possible: uploads on the earliest available date within 3 days.
Important
Once you've sent feedback and requested the final upload schedule, it's hard to go back to a previous step. Please double-check everything before clicking [Send request].
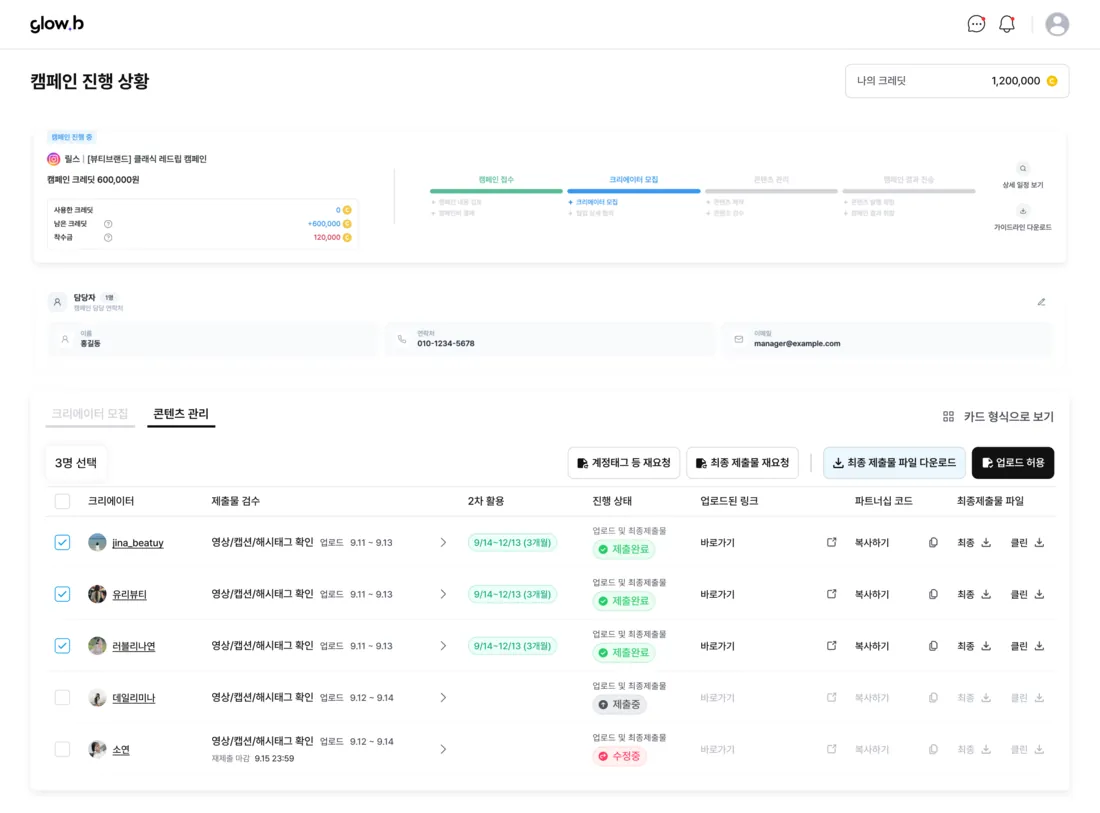
In this step, you review and manage the final deliverables creators submit after officially posting on their own social accounts (post link, ad code, final ad creative, and clean ad creative) in the dashboard.
| Feature | Details |
|---|---|
| Review all deliverables by campaign | See every collaborator's deliverables in one place. Each creator registers 4 deliverables after uploading. |
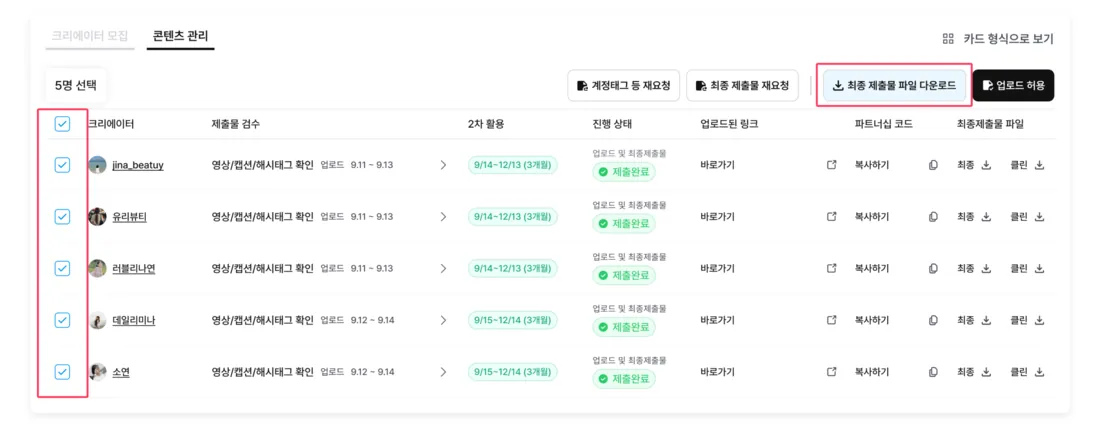
| Keep final deliverables | Save originals individually, or select creators and use [Download final submission files] to get an Excel (.xlsx) file. |
| Track live post links | Check and track the live links of the published short-form videos. |
Reviewing and wrapping up deliverables
- 1
Check the submission notification
An email notification is sent once all 4 final deliverables are registered.
- 2
Review everything in the dashboard
Review the deliverables, post links, and upload settings in the [Content management] tab.
- 3
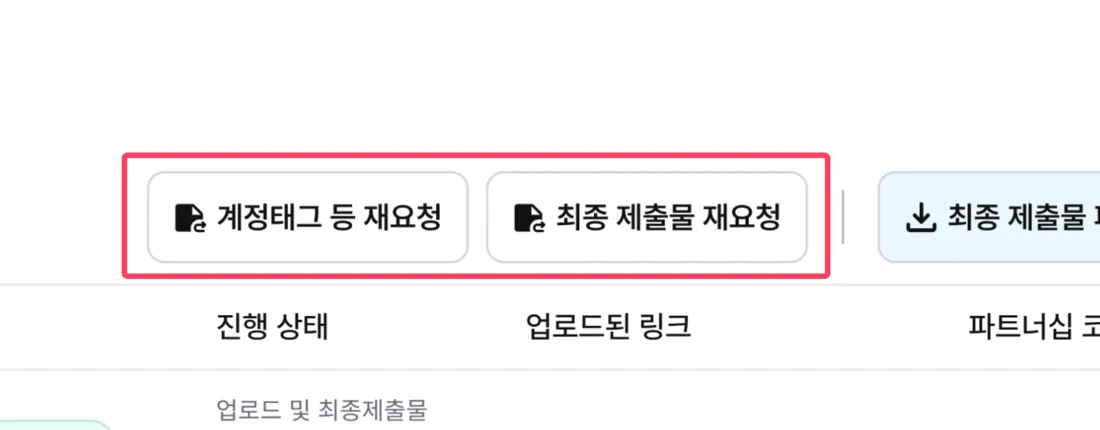
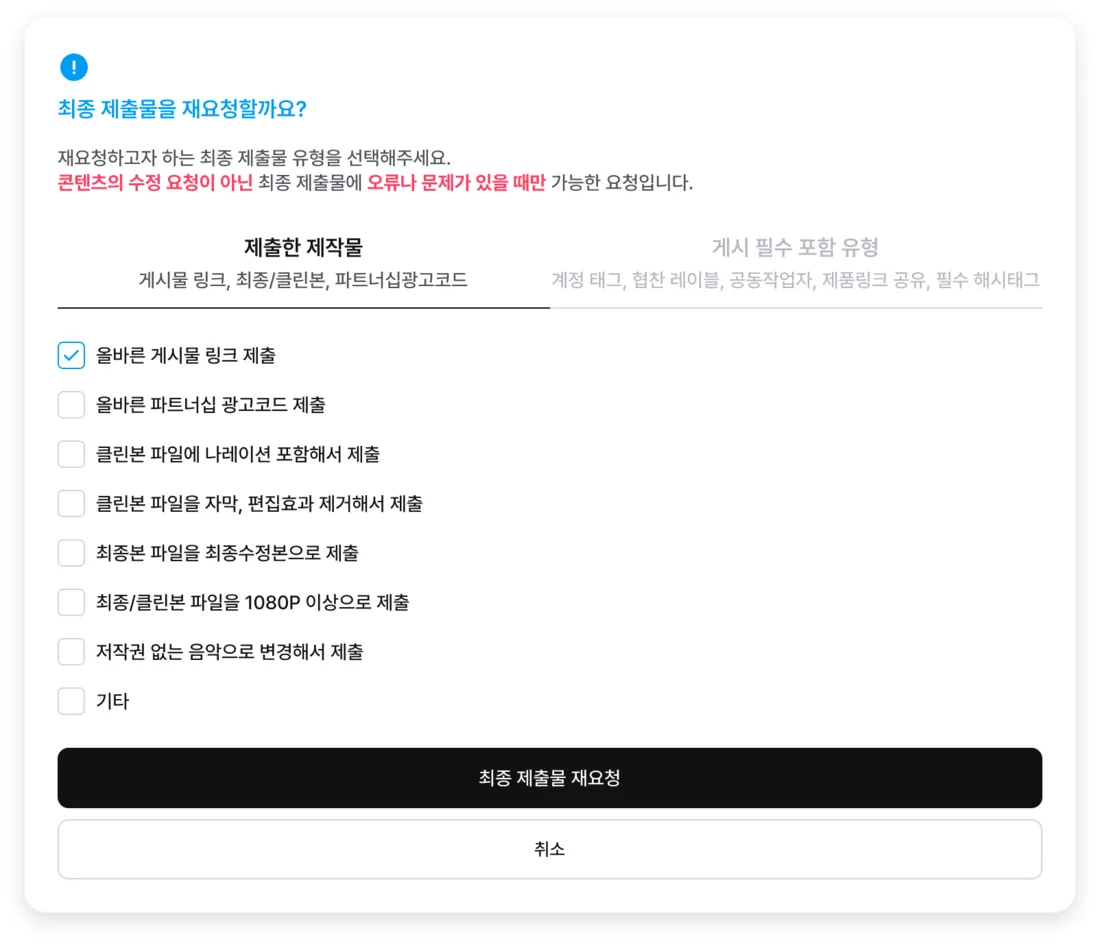
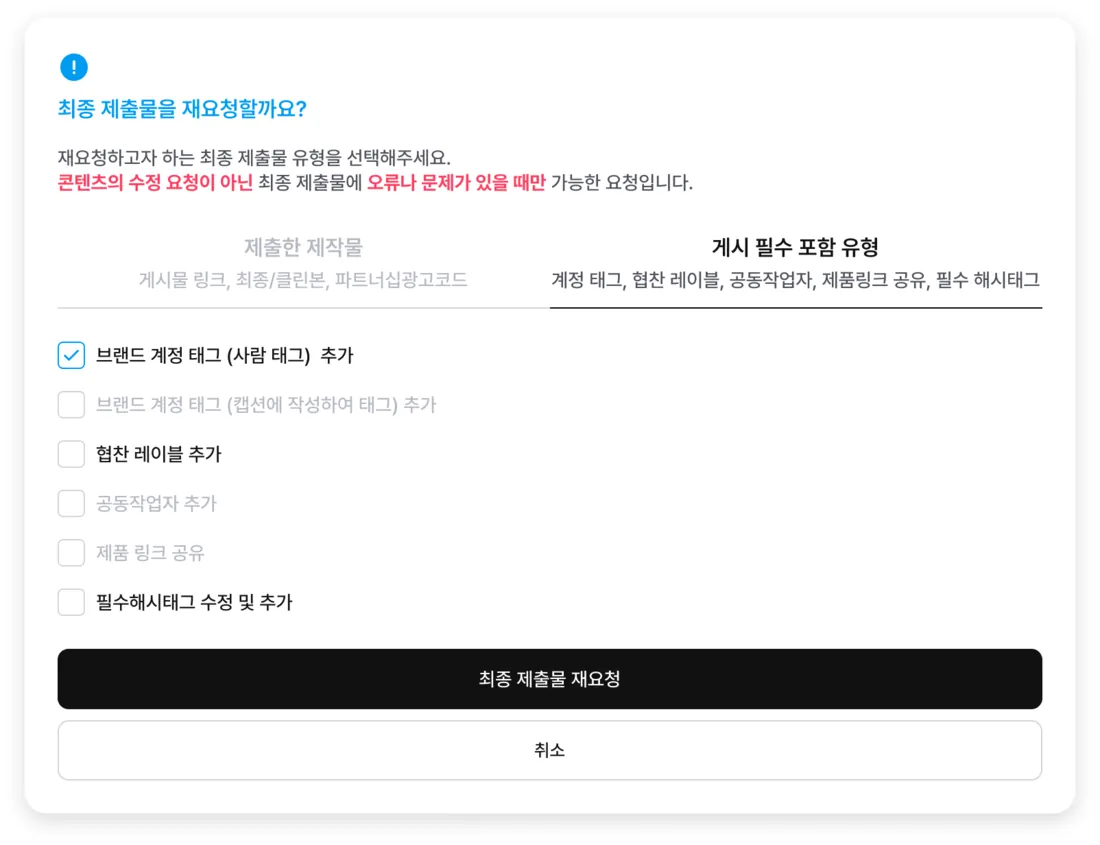
Request changes if needed
If something needs fixing or an upload setting is missing, select the creator and request it with [Re-request account tags, etc.] or [Re-request final submissions].
- 4
Download and wrap up
If everything looks good, download all the files and keep them as assets for secondary usage and archiving.
In this step, you track real-time performance of your connected Meta ad campaigns and analyze and export daily insights.
| Metric | Definition |
|---|---|
| Total spend / Spend | Cumulative budget spent on a campaign or across all ads |
| Purchases (conversions) | Number of conversions driven by creator ad creatives |
| Impressions / Reach | Times the ad was shown (impressions) and unique people who saw it (reach, deduplicated) |
| Clicks / CTR | Landing page clicks and click-through rate relative to impressions |
| CPC / CPM | Cost per link click, and cost per 1,000 impressions |
| Frequency | Average number of times each person saw the ad. Used to gauge ad fatigue |
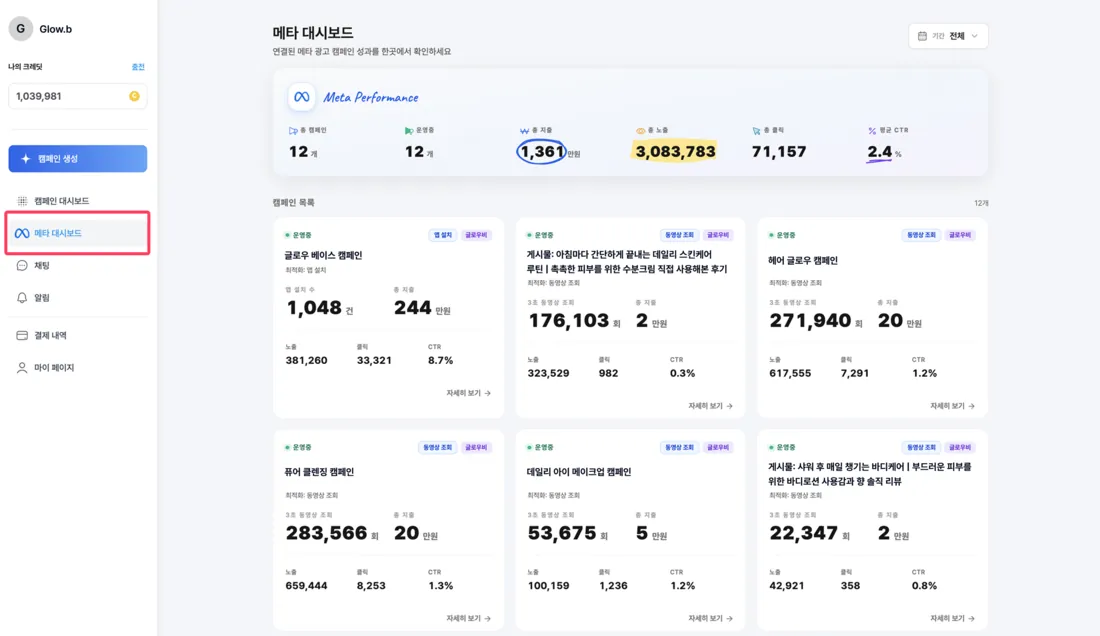
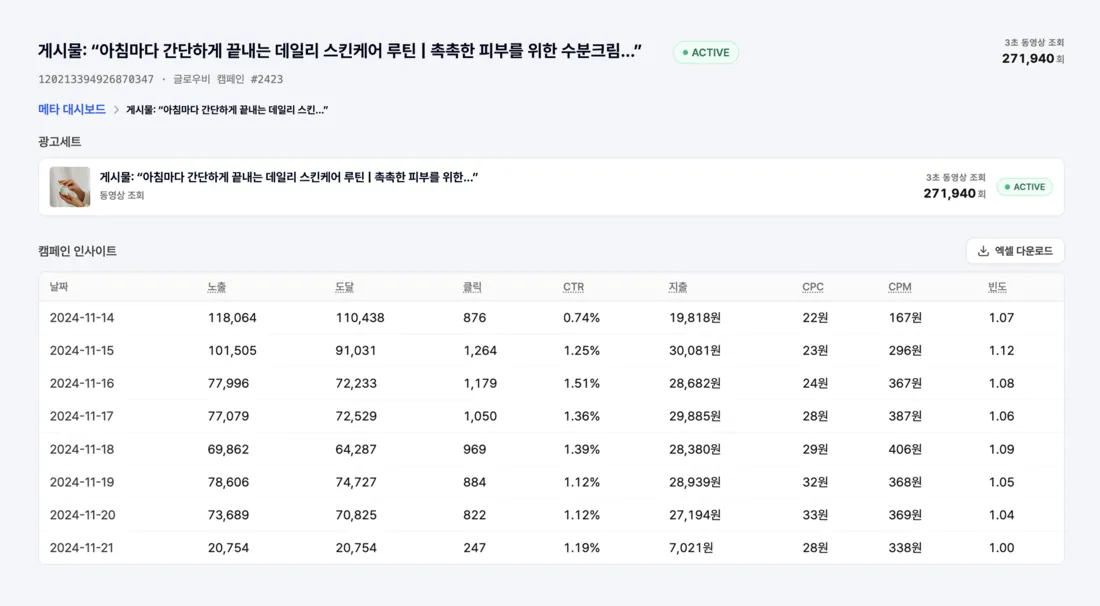
Analyzing and managing data
- 1
Monitor top-line performance
See total spend, total impressions, total clicks, and average CTR at the top.
- 2
Compare campaign performance
Compare status (Active/Paused), conversions, and spend across the campaign cards.
- 3
Detailed insights
Click [View details] at the bottom right of a card.
- 4
Daily trends and export
Check daily impressions, reach, clicks, CTR, CPC, CPM, and frequency, and click [Download Excel] at the top right to get the raw data.
Wrapping up
Once you've completed Chapter 7, you've gone through the full Glow.B business flow: creating a campaign, selecting creators, managing progress, securing deliverables, and checking performance.
To start your next campaign, go back to the campaign creation step in Chapter 2 and create a new one. If you have questions along the way, contact your sales representative or the Glow.B KakaoTalk channel.